Table of Contents
Introduction to chatbot c# sample code
Because they improve user experiences and streamline user interactions, chatbots are already essential parts of modern apps.
Developing a chatbot is not only feasible but also provides a solid answer in the field of C# programming.
Best C# Pojects With Source Code
This post will examine the details of a C# chatbot that is created using given code, breaking it down into its component parts and walking you through the setup procedure.
Today's Giveaway:
Promo Code to book 10% cheap flights: https://wayaway.tp.st/4uQYCHhG
c# projects with source code
chatbot c#
chatbot in c#
chatbot source code
chatbot c# sample code
chatbot c#
chatbot in c#
c# chatbot
Main Features of Auto Reply Advance C# ChatBot
Main Features are:
- Add Chat.
- Chat Timing .
- Chat Mode.
- Artificial intelligence Concept.
- Save Chat.
- Auto Reply.
- Match content.
- Set timer .
- Accuracy Level 80-90 percent
You can access the system using the following accounts.
- Username : admin
- Password: admin
Installing Packages
First of all let’s make sure the Microsoft Bot Framework SDK is installed before proceeding. Installing it with NuGet Package Manager is possible:
Install-Package Microsoft.Bot.Builder -Version 4.14.0
Install-Package Microsoft.Bot.Builder.Dialogs -Version 4.14.0
Install-Package Microsoft.Bot.Builder.Integration.AspNet.WebApi -Version 4.14.0
We can now construct a basic console-based c# chatbot:
using System;
using Microsoft.Bot.Builder;
using Microsoft.Bot.Builder.Dialogs;
using Microsoft.Bot.Builder.Integration.AspNet.WebApi;
using Microsoft.Bot.Builder.TraceExtensions;
using Microsoft.Bot.Connector.Authentication;
using Microsoft.Extensions.Configuration;
using Microsoft.Extensions.Logging;

class Program
{
    static void Main(string[] args)
    {
        var configuration = new ConfigurationBuilder().AddJsonFile("appsettings.json").Build();

        var credentials = new MicrosoftAppCredentials(
            configuration["MicrosoftAppId"],
            configuration["MicrosoftAppPassword"]);

        var adapter = new BotFrameworkHttpAdapter(credentials)
            .Use(new RegisterClassMiddleware<IConfiguration>(configuration))
            .Use(new LoggerMiddleware());

        var bot = new SimpleBot();

        adapter.OnTurnError = async (context, exception) =>
        {
            // Log any errors that occur.
            Console.WriteLine($"[OnTurnError] unhandled error: {exception.Message}");
            await context.SendActivityAsync("Sorry, it looks like something went wrong.");
        };

        var server = new BotFrameworkHttpServer();
        server.Register("api/messages", adapter);
        server.Start();

        Console.WriteLine("Bot listening on http://localhost:3978/api/messages. Press Enter to exit.");
        Console.ReadLine();

        server.Stop();
    }
}

public class SimpleBot : IBot
{
    public async Task OnTurnAsync(ITurnContext turnContext, CancellationToken cancellationToken = default)
    {
        if (turnContext.Activity.Type == ActivityTypes.Message)
        {
            var replyText = $"Echo: {turnContext.Activity.Text}";
            await turnContext.SendActivityAsync(MessageFactory.Text(replyText, replyText), cancellationToken);
        }
    }
}

public class LoggerMiddleware : IMiddleware<IConfiguration>
{
    private readonly ILogger<LoggerMiddleware> _logger;

    public LoggerMiddleware(ILogger<LoggerMiddleware> logger)
    {
        _logger = logger ?? throw new ArgumentNullException(nameof(logger));
    }

    public async Task OnTurnAsync(ITurnContext turnContext, NextDelegate next, IConfiguration configuration, CancellationToken cancellationToken = default)
    {
        _logger.LogInformation("TurnContext: {0}", JsonConvert.SerializeObject(turnContext.Activity));
        await next(cancellationToken);
    }
}
Make sure your real Microsoft App ID and password are substituted for MicrosoftAppId and MicrosoftAppPassword in appsettings.json.
Setting Up Your ChatGPT API Access
Before we start building our chatbot, we need to set up access to the ChatGPT API.
Signing up for OpenAI
If you already have an OpenAI account, skip this section
To access the ChatGPT API, you first need to sign up for an account with OpenAI. Follow these steps:
- Visit the OpenAI website at https://platform.openai.com/login
- Fill out the required information and create your account.
- Once your account is created, log in and navigate to the API section.
Obtaining API access keys
To use the ChatGPT API in your C# project, you’ll need an API access key. Here’s how to get one:
1. Log in to your OpenAI account.
2. Go to the “View API Keys” section.
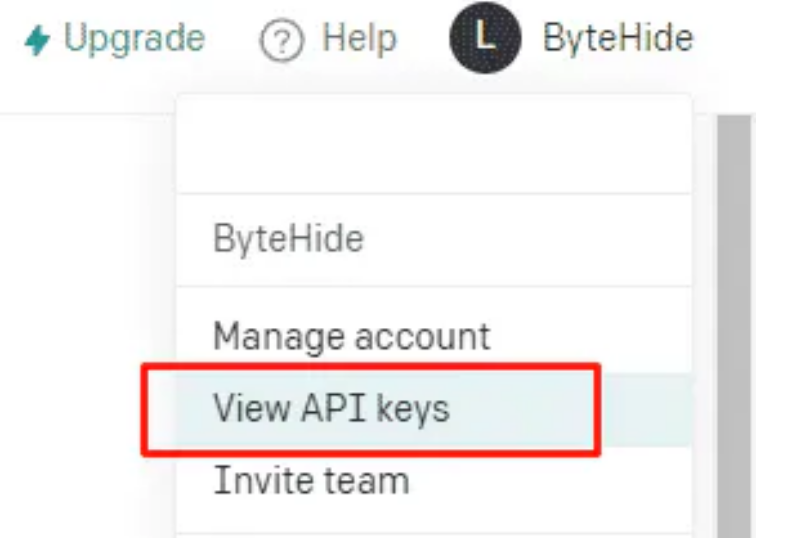
3. Click on “Create API Key” and give it an appropriate name.
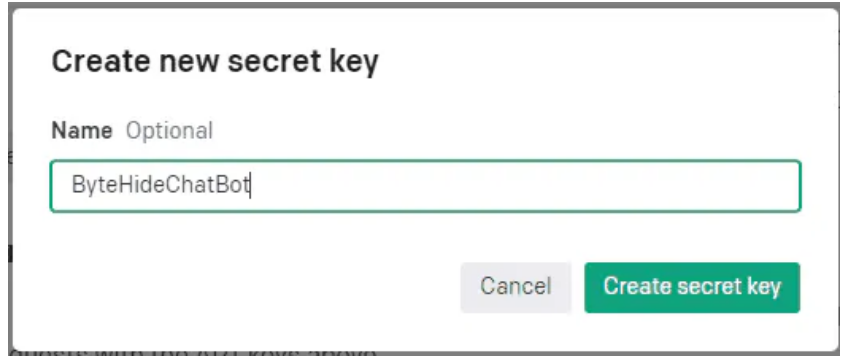
4. Copy the API key, as you’ll need it later.
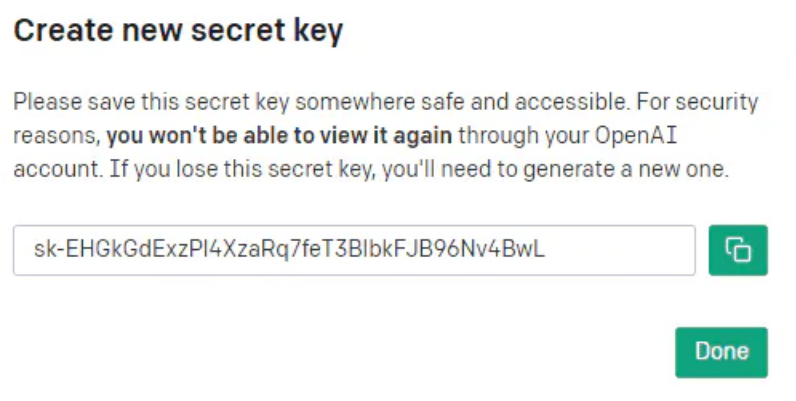
The API Key above do not try to use it, it does not work.
Keep your API key secure, as it grants access to your ChatGPT API usage.
Creating a C# Project for Your ChatGPT Chatbot
Now that we have our ChatGPT API access set up, it’s time to create a new C# project for our chatbot.
Setting up a new C# project
To create a new C# project, you can use Visual Studio, Visual Studio Code, or any other IDE that supports C#. Follow these steps:
- Open your preferred IDE and create a new C# project.
- Choose the “Console App” template and provide a name for your project.
- Click “Create” to generate the project.

Installing necessary packages
We’ll need to install some NuGet packages to help us interact with the ChatGPT API:
RestSharp: A library for making HTTP requests.Newtonsoft.Json: A library for handling JSON data.
To install these packages, run the following commands in your IDE’s package manager console:

chatbot c# sample code
chatbot in c#
chatbot c#
c# projects with source code free
chatbot c# sample code
c# chatbot
Integrating ChatGPT API with Your C# Project
With our project set up, it’s time to integrate the ChatGPT API.
Creating a ChatGPT API client
First, let’s create a C# class to interact with the ChatGPT API. We’ll call it ChatGPTClient. Here’s the basic structure:
using System;
using RestSharp;
using Newtonsoft.Json;

public class ChatGPTClient
{
    private readonly string _apiKey;
    private readonly RestClient _client;

    // Constructor that takes the API key as a parameter
    public ChatGPTClient(string apiKey)
    {
            _apiKey = apiKey;
            // Initialize the RestClient with the ChatGPT API endpoint
            _client = new RestClient("https://api.openai.com/v1/engines/text-davinci-003/completions");
    }

    // We'll add methods here to interact with the API.
}
In this code lair, we’ll grab our secret API key (like a magic password!) and build a special messenger called a RestClient. This messenger knows exactly where to find ChatGPT’s API endpoint (think of it as a secret lair entrance). Get ready to send some messages!
Now, let’s craft a super cool method to send messages to the API. This method will be our personal message carrier pigeon!
// Method to send a message to the ChatGPT API and return the response
        public string SendMessage(string message)
        {
            // Create a new POST request
            var request = new RestRequest("", Method.Post);
            // Set the Content-Type header
            request.AddHeader("Content-Type", "application/json");
            // Set the Authorization header with the API key
            request.AddHeader("Authorization", $"Bearer {_apiKey}");

            // Create the request body with the message and other parameters
            var requestBody = new
            {
                prompt = message,
                max_tokens = 100,
                n = 1,
                stop = (string?)null,
                temperature = 0.7,
            };

            // Add the JSON body to the request
            request.AddJsonBody(JsonConvert.SerializeObject(requestBody));

            // Execute the request and receive the response
            var response = _client.Execute(request);

            // Deserialize the response JSON content
            var jsonResponse = JsonConvert.DeserializeObject<dynamic>(response.Content ?? string.Empty);

            // Extract and return the chatbot's response text
            return jsonResponse?.choices[0]?.text?.ToString()?.Trim() ?? string.Empty;
        }
Our message-making machine takes your text, builds a fancy package for ChatGPT, and delivers it! Then, it grabs ChatGPT’s reply and hands it back to you. Boom! ➡️⬅️
Implementing chatbot logic
With our ChatGPTClient in place, let’s implement the chatbot logic in our Program class:
 class Program
        {
            static void Main(string[] args)
            {
                // Replace with your ChatGPT API key
                string apiKey = "your_api_key_here";
                // Create a ChatGPTClient instance with the API key
                var chatGPTClient = new ChatGPTClient(apiKey);

                // Display a welcome message
                Console.WriteLine("Welcome to the ChatGPT chatbot! Type 'exit' to quit.");

                // Enter a loop to take user input and display chatbot responses
                while (true)
                {
                    // Prompt the user for input
                    Console.ForegroundColor = ConsoleColor.Green; // Set text color to green
                    Console.Write("You: ");
                    Console.ResetColor(); // Reset text color to default
                    string input = Console.ReadLine() ?? string.Empty;

                    // Exit the loop if the user types "exit"
                    if (input.ToLower() == "exit")
                        break;

                    // Send the user's input to the ChatGPT API and receive a response
                    string response = chatGPTClient.SendMessage(input);

                    // Display the chatbot's response
                    Console.ForegroundColor = ConsoleColor.Blue; // Set text color to blue
                    Console.Write("Chatbot: ");
                    Console.ResetColor(); // Reset text color to default
                    Console.WriteLine(response);
                }
            }
        }
We build a special ChatGPT buddy with your secret API key. Then, it’s chat time! You feed it messages, it sends them to ChatGPT, and zooms back with the chatbot’s reply. Talk about a chatty sidekick!
Testing and Enhancing Your ChatGPT Chatbot
We’ve built our very own ChatGPT chatbot, but is it ready to chat like a champ? Let’s find out!
Fire Up the Test Track:
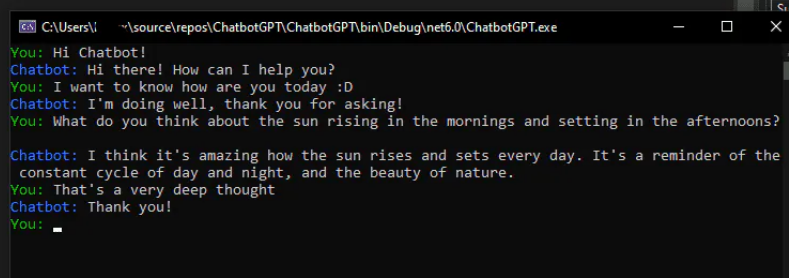
Just run your C# project, and voila! A fancy console window pops up. This is your personal chat zone. Type in your messages, hit enter, and see what awesome response your chatbot whips up! It’s like having your own mini ChatGPT right at your fingertips.
Handling errors and edge cases
It’s important to handle errors and edge cases in your chatbot. For example, you could check for empty input, add error handling for API requests, or implement a timeout for long-running requests.
public string SendMessage(string message)
{
    // Check for empty input
    if (string.IsNullOrWhiteSpace(message))
    {
        return "Sorry, I didn't receive any input. Please try again!";
    }

    try
    {
        // The rest of the SendMessage method implementation...
    }
    catch (Exception ex)
    {
        // Handle any exceptions that may occur during the API request
        Console.WriteLine($"Error: {ex.Message}");
        return "Sorry, there was an error processing your request. Please try again later.";
    }
}
Improving user experience
Consider the following tips to enhance your chatbot’s usability:
- Add a help command to provide guidance on using the chatbot.
// Enter a loop to take user input and display chatbot responses
while (true)
{
    // Prompt the user for input
    Console.ForegroundColor = ConsoleColor.Green; // Set text color to green
    Console.Write("You: ");
    Console.ResetColor(); // Reset text color to default
    string input = Console.ReadLine() ?? string.Empty;

    // Exit the loop if the user types "exit"
    if (input.ToLower() == "exit")
        break;

    // Display help message if the user types "help"
    if (input.ToLower() == "help")
    {
        Console.WriteLine("Chatbot commands:");
        Console.WriteLine("- Type your message to chat with the bot.");
        Console.WriteLine("- Type 'exit' to quit the chat.");
        continue;
    }

    // Send the user's input to the ChatGPT API and receive a response
    string response = chatGPTClient.SendMessage(input);

    // Display the chatbot's response
    Console.ForegroundColor = ConsoleColor.Blue; // Set text color to blue
    Console.Write("Chatbot: ");
    Console.ResetColor(); // Reset text color to default
    Console.WriteLine(response);
}- Implement a more natural conversation flow by maintaining context between messages.
private string _conversationHistory = string.Empty;

public string SendMessage(string message)
{
    // Check for empty input
    if (string.IsNullOrWhiteSpace(message))
    {
        return "Sorry, I didn't receive any input. Please try again!";
    }

    // Update the conversation history with the user's message
    _conversationHistory += $"User: {message}\n";

    // ... (the rest of the SendMessage method remains unchanged)

    // Deserialize the response JSON content
    var jsonResponse = JsonConvert.DeserializeObject<dynamic>(response.Content ?? string.Empty);

    // Extract and return the chatbot's response text
    string chatbotResponse = jsonResponse?.choices[0]?.text?.ToString()?.Trim() ?? string.Empty;

    // Update the conversation history with the chatbot's response
    _conversationHistory += $"Chatbot: {chatbotResponse}\n";

    return chatbotResponse;
}- Use richer formatting or user interface elements to improve readability.
// Enter a loop to take user input and display chatbot responses
while (true)
{
    // Prompt the user for input
    Console.ForegroundColor = ConsoleColor.Green; // Set text color to green
    Console.Write("You: ");
    Console.ResetColor(); // Reset text color to default
    string input = Console.ReadLine() ?? string.Empty;

    // ... (handle 'exit' and 'help' commands as before)

    // Send the user's input to the ChatGPT API and receive a response
    string response = chatGPTClient.SendMessage(input);

    // Display the chatbot's response
    Console.ForegroundColor = ConsoleColor.Blue; // Set text color to blue
    Console.Write("Chatbot: ");
    Console.ResetColor(); // Reset text color to default
    Console.WriteLine(response);

    // Add a separator and some line breaks
    Console.WriteLine();
    Console.WriteLine("------------------------------------------------");
    Console.WriteLine();
}
chatbot c# sample code
chatbot in c#
chatbot c#
c# projects with source code free
Understand our C# chatbot Code
Let’s begin by dissecting the sample of C# code that was provided. The code is based on Microsoft’s Bot.
Builder framework and contains necessary parts including BotFrameworkHttpAdapter, Dialogs, and Middleware.
Configuring the Chatbot in C#
You must configure the chatbot locally in order to interact with it directly.
To ensure a seamless development process, use the provided code to configure the chatbot by following these steps.

c# chatbot
c# project with source code
c# projects for beginners with source code
c# projects with source code
c++ exercise
certification assessment google digital garage
chat gpt humanizer
chatbot c#
chatbot in c#
chatbot java source code
chatbot project with source code
chatbot source code

Middleware & BotFrameworkHttpAdapter
An essential component in tying the chatbot and the Bot Framework together is the BotFrameworkHttpAdapter. Furthermore, middleware features improve the bot’s functionality. We’ll go into great depth about their relevance.
Class SimpleBot
The OnTurnAsync method of the chatbot is located in the SimpleBot class, which serves as its brain. Knowing this class is essential to understanding how the bot reads and reacts to messages from users.
Managing TurnContext
The TurnContext is a key component of the C# code that controls user interactions. We’ll break down how it’s used and discuss why message type verification is important for efficient communication.
MicrosoftAppCredentials Security in the creation of bots is crucial. Find out how MicrosoftAppCredentials offer a safe method to manage app credentials while protecting private data.
chatbot c# sample code
chatbot in c#
chatbot c#
c# projects with source code free
chatbot c# sample code
c# chatbot
Middleware for Loggers
To track actions, logging is a crucial component of bot creation. By ensuring that actions are properly logged, the LoggerMiddleware facilitates efficient debugging and analysis.
- The C# Chatbot is being used and tested.
It’s now time to launch and test the chatbot locally after the setup is finished. We’ll walk you through the steps and give you information on testing conditions and anticipated results. - Error handling and troubleshooting
There are always obstacles in the path of development. Learn about potential common problems and effective troubleshooting techniques. We will also investigate the OnTurnError event for more thorough problem handling. - Improvements and Personalization
Investigate how to improve and personalize your chatbot to take it to the next level. The possibilities are endless, ranging from introducing distinctive features to adding new functionalities. - Advantages of C# for Chatbot Development Why should you develop chatbots in C#? We’ll go over the benefits that make C# a great option as well as how well it works with other Microsoft technologies.
- Practical Use Cases Examine practical situations where C# chatbots are effective. The adaptability of C# chatbots has been demonstrated by its use in interactive training tools and customer assistance across several industries.
- Community Resources and Assistance Make contact with the vibrant community of C# chatbot developers. Find discussion boards, links, and help channels to help you on your C# chatbot development journey.

Learn more
chatbot c# sample code
chatbot in c#
chatbot c#
c# projects with source code free
chatbot c# sample code
In summary
To sum up, creating a C# chatbot is a fun project with lots of potential for creative uses. All the necessary topics have been covered, including deciphering the code and operating and improving the bot.
It’s your chance to learn, grow, and improve your C# chatbot creation abilities now.
FAQs
- How to make a chatbot in C#?
- Develop a chatbot in C# using Microsoft’s Bot.Builder framework. Utilize the provided code snippet, configure the BotFrameworkHttpAdapter, and understand key components like Dialogs and Middleware.
- How to create a chatbot in C?
- Create a chatbot in C by using libraries like ChatterBot. Write code to handle user inputs, define responses, and manage conversational flow.
- How to use ChatGPT in C#?
- Access ChatGPT in C# by making API requests to OpenAI’s GPT-3.5 model. Use libraries like
HttpClientfor communication and handle responses accordingly.
- Access ChatGPT in C# by making API requests to OpenAI’s GPT-3.5 model. Use libraries like
- Can I use chatbot for coding?
- Yes, you can use a chatbot for coding assistance. Some chatbots, like those built with ChatGPT, can help generate code snippets, provide coding advice, and answer programming-related queries.
- Is GPT good for coding?
- Yes, GPT (Generative Pre-trained Transformer) models, including GPT-3, can be valuable for coding. They can assist in generating code snippets, providing coding suggestions, and aiding in problem-solving. However, they are not a replacement for the expertise and creativity of human programmers.
- Will GPT-4 replace programmers?
- No, GPT-4 or any other AI model is unlikely to replace programmers entirely. While AI can automate certain coding tasks and assist in development, the unique problem-solving abilities, creativity, and critical thinking skills of human programmers are irreplaceable. AI is a tool to augment and enhance the capabilities of programmers, not replace them.
- How to use OpenAI API key in C#:
- To use OpenAI API key in C#, create HTTP requests using libraries like
HttpClient. Include the API key in the request headers for authentication.
- To use OpenAI API key in C#, create HTTP requests using libraries like
- How to create a chatbot in Visual Studio?
- Create a chatbot in Visual Studio using frameworks like Microsoft Bot Framework. Develop, debug, and test your chatbot using the integrated development environment (IDE) in Visual Studio.
- How to run C# in VBA?
- Running C# in VBA (Visual Basic for Applications) involves using interoperability features. Compile C# code into a DLL and call it from VBA using COM Interop.


0 Comments