Table of Contents
Introduction to chatbot in php
Hi everyone! We will create Chatbot in php. You are aware of how chatbots operate, right? I thought it would be fun to use PHP, HTML, and JavaScript to create a basic one together. It’s not as hard as it seems, so don’t worry! Allow me to explain it to you.
PHP Projects:
- Quiz Application in PHP
- PHP Image Gallery Project Source Code
- Best 200 Questions Game in PHP
- Bulletin Board PHP Project
- Content Management System (CMS) PhP Project
- Event Management System Project in PHP
- Personal Blog with PHP
- Chatbot in PHP
- URL Shortenee in php
Today’s Giveaway: Promo Code to book 10% cheap flights: Coupon Code
Chatbot cost varies, chat bot cost varies, chatbot price varies, chatbots cost varies, chat bot price varies, chatbot prices vary, how much do chatbots cost, how much does chatbot cost, cost of chatbot varies, how much does a chatbot cost, chatbot pricing model.
Ready to Build? Here’s What You’ll Need:
This project requires a little bit of knowledge in a few areas:
- Basic PHP Scripting: We’ll be using PHP to handle some things on the server side.
- Basic Javascript: Javascript (JS) will help us make requests to the server in the background (AJAX). Don’t worry if you’re new to these – I’ll explain each code block with plenty of comments along the way.
To run the project, you’ll also need to install either WampServer or XAMPP. These are software packages that come with everything you need, like Apache and MySQL, to run the project on your computer.
Feeling prepared? Let’s jump in!
Step 1: Configuring the HTML Structure
Firstly, we require a location to host our chat. We establish a basic framework in the HTML file index.html, which includes a chat container, a message display area, a typing input field, and a message sending button.
<!DOCTYPE html>
<html lang="en">
<head>
    <meta charset="UTF-8">
    <meta name="viewport" content="width=device-width, initial-scale=1.0">
    <title>PHP Chatbot</title>
</head>
<body>

<div id="chat-container">
    <div id="chat-display"></div>
    <input type="text" id="user-input" placeholder="Type your message...">
    <button onclick="sendMessage()">Send</button>
</div>

<script>
    // Our JavaScript functions go here
</script>

</body>
</html>
ChatbotCost #ChatbotPricing #ChatbotPrices #HowMuchIsAChatbot #CostOfChatbot

Today’s Giveaway: Promo Code to book 10% cheap flights: Coupon Code
Imagine the chat app is a sandwich. We’ve got three main layers:
- The Top Bun (Header): This holds the catchy title for your awesome chat app.
- The Filling (Body): This is where all the conversation magic happens! Messages from you and the bot will appear here, pulled fresh from the database using JavaScript (like magic!).
- The Bottom Bun (Input Area): This is where you chat! There’s a handy form so you can type your messages and send them on their way.
All these layers are nestled inside a bigger container, which itself lives within the main chat app page.
php exercises
php lab exercises
php mvc folder structure best practices
php mvc framework from scratch
php mvc from scratch
php mvc project
php photo database
php photo gallery
php practice exercises
php project source code
php projects source code
php projects with source code github
php realtime chat
Step 2: Integrating Magic JavaScript
Ready to see how it all works together? Let’s dig in!
Let’s now get our conversation interactive! JavaScript is used to manage message sending and presentation. Upon clicking the “Send” button, an XMLHttpRequest is used to send your message to the server. After processing the message, the server (PHP) replies, which we show in the chat window.
// Inside the <script> tag in index.html

function sendMessage() {
    var userInput = document.getElementById("user-input").value;
    displayMessage("You: " + userInput);

    var xhr = new XMLHttpRequest();
    xhr.onreadystatechange = function () {
        if (xhr.readyState == 4 && xhr.status == 200) {
            var response = xhr.responseText;
            displayMessage("Bot: " + response);
        }
    };
    xhr.open("GET", "process.php?userInput=" + userInput, true);
    xhr.send();
}

function displayMessage(message) {
    var chatDisplay = document.getElementById("chat-display");
    chatDisplay.innerHTML += "<p>" + message + "</p>";
}
photo gallery php
php exercises
php exercises and solutions
php exercises and solutions pdf
php exercises online
php lab exercises
php mvc framework from scratch
php mvc from scratch
Step 3: Add creativity with PHP
Gearing Up for Database Magic: The PHP Script!
Now that we’ve explored the chat app’s layout, it’s time to build the brains behind the operation – the PHP script! This script will be the bridge between the user’s messages and the database, fetching the perfect reply for each chat.
Now, the intelligent work is handled by the PHP script (process.php).
After receiving your message, it employs a basic function to process it and then replies. The function getBotResponse converts your input into pre-written replies.
Ready to code? Create a new .php file and paste the following code into it:
<?php
// Inside process.php

$userInput = $_GET['userInput'];

$botResponse = getBotResponse($userInput);

echo $botResponse;

function getBotResponse($userInput) {
    $responses = array(
        "Hello" => "Hi there! How can I help you?",
        "How are you" => "I'm just a bot, but thanks for asking!",
        "Default" => "I'm not sure how to respond to that. Ask me something else."
    );

    $userInput = strtolower($userInput);
    $response = $responses[$userInput] ?? $responses["Default"];

    return $response;
}
?>
Chatbot cost varies Chat bot cost varies Chatbot price varies Chatbots cost varies Chat bot price varies Chatbot prices vary How much do chatbots cost? How much does chatbot cost? Cost of chatbot varies How much does a chatbot cost? Chatbot pricing model
Today’s Giveaway: Promo Code to book 10% cheap flights: Coupon Code
Create chatbot replies in MySQL database
The PHP script is primed and ready! Now, let’s give our chatbot some personality by adding messages and replies to its database.
Here’s the Toolbox:
- WAMP/XAMPP: These tools provide a user-friendly interface (phpMyAdmin) to manage your database.
- http://localhost/phpmyadmin/index.php: This is the magic link to access phpMyAdmin (assuming default settings).
- Username: “root” (default)
- Password: (blank by default)
- Database: MySQL (default)
Let’s Build the Chatbot’s Knowledge Base:
- Create a Database: Inside phpMyAdmin, give your database a memorable name (e.g., “chatbot_wisdom”).
- Craft the Message Table: Within the database, create a table to store user messages and replies.
- Define the Table Heroes: Here’s what goes inside the table:
- id (auto incrementing): This is a unique identifier assigned automatically for each record.
- messages: This is where you’ll store all the user messages your chatbot might encounter. Think of it as the chatbot’s ear!
- replies: This is the chatbot’s voice! Here, you’ll store witty replies for each message in the “messages” field.
- Fill it Up!: The more messages and replies you add, the more engaging your chatbot will be. Get creative and have fun!
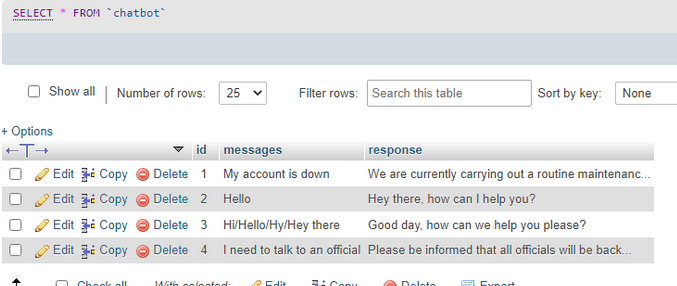
Here’s a sneak peek at what your table might look like:
| id | messages | replies |
|---|---|---|
| 1 | Hi! | Hey there! How can I chat with you today? |
| 2 | What’s the weather like? | It depends on your location! Would you like me to find out? |
| 3 | Feeling a bit bored. | Let’s cure those boredom blues! What are you interested in? |
| … | (and so on) | (and so on) |
Remember: The more messages and replies you add, the smarter and more engaging your chatbot will become!
php mvc project source code
php photo database
php photo gallery
php project source code
php projects source code
php projects with source code
php real time application
php real time chat application
php realtime chat
Make AJAX request from JavaScript and insert messages
With the database brimming with witty replies and the PHP script ready to fetch them, it’s time to tie everything together! We’ll use JavaScript to create an AJAX request from the front-end, allowing users to chat and receive responses seamlessly.
Open Up Your Front-End Code (bot.html):
Find a script tag in your code (or add one if it’s not there) and paste the following JavaScript magic:
<script type="text/javascript">

      // When send button gets clicked
      document.querySelector("#send").addEventListener("click", async () => {

        // create new request object. get user message
        let xhr = new XMLHttpRequest();
        var userMessage = document.querySelector("#userInput").value


        // create html to hold user message.
        let userHtml = '<div class="userSection">'+'<div class="messages user-message">'+userMessage+'</div>'+
        '<div class="seperator"></div>'+'</div>'


        // insert user message into the page
        document.querySelector('#body').innerHTML+= userHtml;

        // open a post request to server script. pass user message as parameter
        xhr.open("POST", "query.php");
        xhr.setRequestHeader("Content-type", "application/x-www-form-urlencoded");
        xhr.send(`messageValue=${userMessage}`);


        // When response is returned, get reply text into HTML and insert in page
        xhr.onload = function () {
            let botHtml = '<div class="botSection">'+'<div class="messages bot-reply">'+this.responseText+'</div>'+
            '<div class="seperator"></div>'+'</div>'

            document.querySelector('#body').innerHTML+= botHtml;
        }

      })

  </script>
Here’s how the magic unfolds when the user clicks the “send” button:
- User Message on Deck: The JavaScript code first grabs the user’s message from the input field.
- Showcasing the User’s Input: The user’s message is displayed on the chat page for everyone to see.
- Calling the Server (AJAX Request): JavaScript then fires off an AJAX request to the server-side script (remember our awesome PHP code?). This request carries the user’s message.
- Server Whispers Back (Response): The server script receives the message, consults the database using the PHP magic we created, and finds the perfect reply. The reply is then sent back to the front-end.
- Chatbot Speaks Up!: JavaScript receives the reply from the server and inserts it into the chat page. Now the user can see the chatbot’s response!
This constant back-and-forth between JavaScript, the server script, and the database is what makes the chat app come alive!
FAQ
- How to build a basic chatbot?
- Create an HTML/JavaScript interface for user interaction.
- Use a server-side language like PHP to process user input.
- Implement predefined responses or integrate with an AI service for dynamic replies.
- Can I make my own AI chatbot?
- Yes, you can build your own AI chatbot. Use platforms like Dialogflow, Wit.ai, or build a custom solution with natural language processing.
- How to create an online chatbot in PHP MySQL campcodes?
- Use PHP for server-side processing.
- Implement MySQL to store data if needed.
- Combine with HTML/JavaScript for the user interface.
- How to make a chat in PHP?
- Create an HTML page for the chat interface.
- Use PHP to process and respond to user input.
- Use JavaScript for real-time updates.
- How to create a WhatsApp chatbot in PHP?
- WhatsApp API integration may require third-party services.
- Implement PHP to handle communication with the WhatsApp API.
- Which is the free chatbot for PHP websites?
- Some free options include Microsoft Bot Framework, Dialogflow, and Wit.ai.
- Can I create a WhatsApp chatbot for free?
- WhatsApp API usage often involves costs, but some platforms offer limited free access.
- Is AI chatbot free?
- Many AI chatbot platforms have free tiers with limited usage. Evaluate pricing plans based on your needs.
Conclusion
And there you have it! We’ve created a simple chatbot together. You can totally play around with this, add more features, or even make it smarter by integrating advanced stuff like natural language processing.
Check this blog for more info: Build a Chatbot with PHP, MySQL and AJAX in 10 minutes
That’s awesome! We’ve built a complete chatbot with a database and user interaction. Let’s put it to the test.
Remember, you can add more messages and replies to the database to expand the chatbot’s knowledge.
Thanks again for following this guide! Darekdari.com truly goes above and beyond – that AI-powered PHP code is seriously cool! If you’re reading this, what other creative uses can AI have in web development?
The coding world is your oyster! Have fun tinkering! 🚀
Learn more


4 Comments
Building A Forum Or Bulletin Board PHP Project Best 2 Codes · June 29, 2024 at 7:38 pm
[…] Chatbot in PHP […]
Creating Best PHP MVC Framework From Scratch 2025 · October 9, 2024 at 7:55 pm
[…] Chatbot in PHP […]
Best 5 Advanced PHP Exercises With Solutions And Explanation · October 9, 2024 at 7:56 pm
[…] Chatbot in PHP […]
Personal Blog With PHP With Source Code Quick And Easy 2024 · October 9, 2024 at 7:59 pm
[…] Chatbot in PHP […]