Table of Contents
How to uninstall WordPress and reinstall WordPress on Hostinger, error establishing database solution: If you have a website hosted on Hostinger and you want to remove WordPress from it, then this article is for you! In this tutorial, I’ll show you how to uninstall WordPress on Hostinger web hosting.
Uninstalling WordPress is usually done when you mess up your WordPress site or you no longer want to use WordPress. I’ll show you a very simple and straightforward process to uninstall WordPress from your site. Let’s see how to do it!
Backup your website
It’s always a good idea to take a backup of your entire website before deleting it or making any big changes. You might need it in the future, and having a backup allows you to restore your website at any point in time.
Creating a complete backup of your website and database in Hostinger is easy. Simply go to the hpanel of your website and navigate to the files section. Under files, you’ll find the backups option. Click on it to open the backups page.
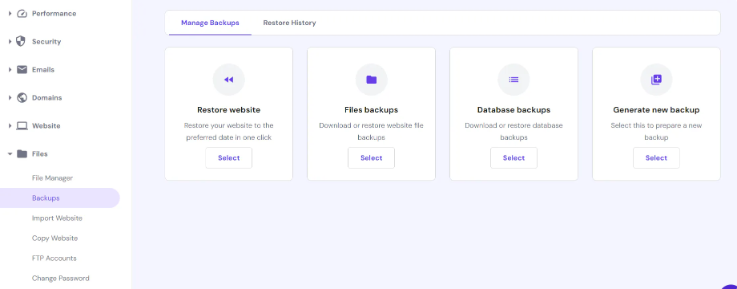
Next, click on “generate new backup.” This will create a complete backup of your website and database, which you can use later to restore your website if needed. It’s just a safety precaution that we should always take before making any major changes. Now, let’s proceed with uninstalling WordPress.
Uninstall WordPress
Now, let’s uninstall WordPress. There are two ways to do it:
- Hostinger Autoinstaller: This is the easy way.
- Manual Deletion: You can delete the database and all the files from the file manager.
I’ll show you both ways.
Uninstalling wordpress using auto installer

To uninstall WordPress via autoinstaller, follow these steps:
- Go to your Hostinger panel of your website.
- Navigate to the “Website” section and click on “Auto Installer.” This will display your WordPress installations.
- Click on the three dots button next to the WordPress installation you want to uninstall. This will show three options: manage, details, and delete.
- Click on “delete.” It will then show you some options.
- Select all the options: delete installations and delete database.
- Click on “delete” again. This will completely remove WordPress.
Uninstalling WordPress manually
If you prefer to uninstall WordPress manually, you can do so via the file manager. Here’s how:
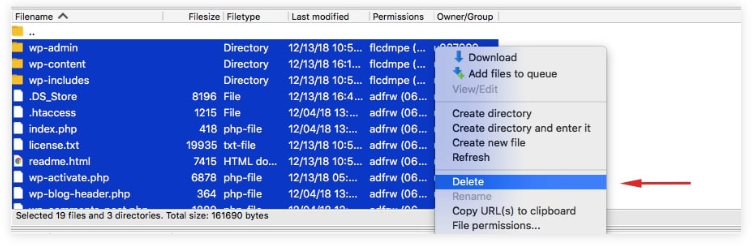
- Go to the Hostinger panel of your website.
- Navigate to the “Files” section and click on “File Manager.” It will look like the image below:
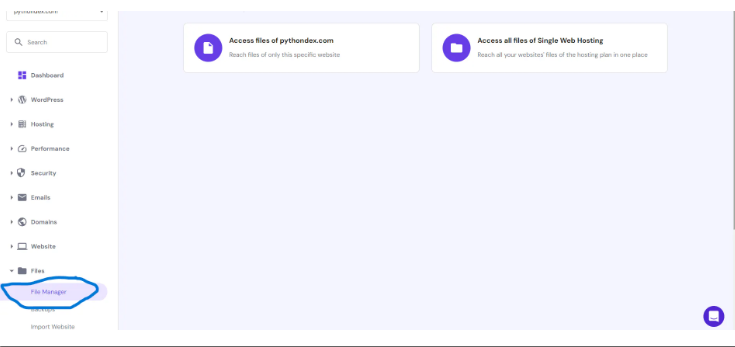
Now, click on “Access files” of your website, and it will open the file manager of your website.
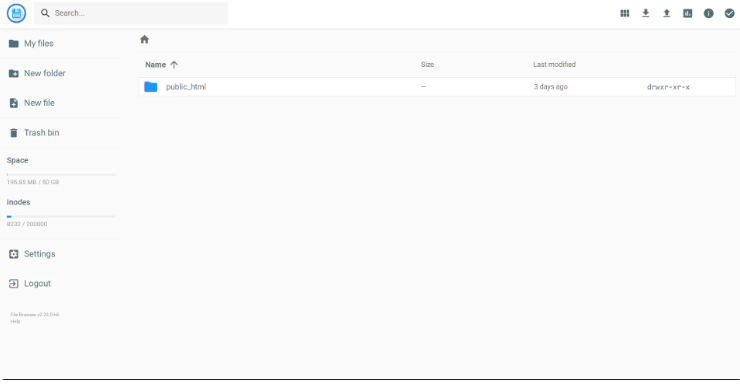
Before you delete all your files, go to your file manager and inside the public_html folder, look for a file called “wp-config.php” and open it. In this file, you’ll find a line like this:
define( 'DB_NAME', 'name of your database' );This line contains the name of your database.

Make sure to note the database name, or you can take a screenshot, as we will need the name for deleting the database later.
Now, go inside the public_html folder and select all the files. Then, hit delete. This will delete all the files of your website.
error establishing a database connection hostinger
error establishing a database connection wordpress hostinger
Deleting the database from Hostinger
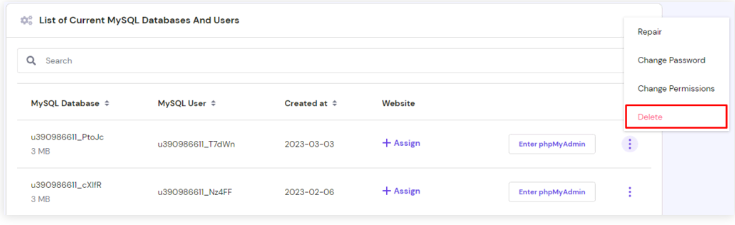
Now that we’ve removed the WordPress installation, we just need to delete the database. To do that, go back to the Hostinger panel and navigate to “Databases.” Click on “Management,” and it will show your databases:
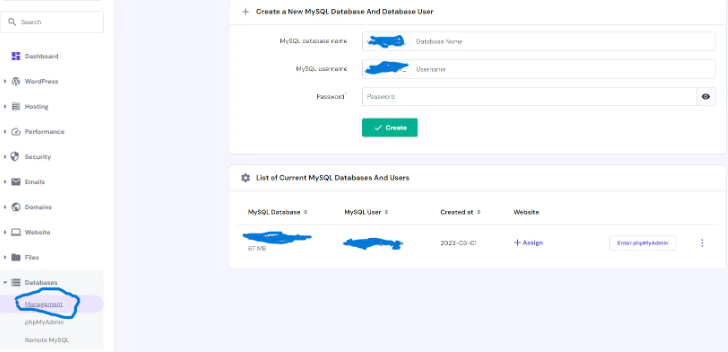
Now, click on the three dots button beside the database and select “Delete.” This will delete your database. If you have multiple databases, make sure to only delete the one whose name you noted from the wp-config file earlier.
If you’re considering buying web hosting from Hostinger, you can use this Discount Link for a massive discount on web hosting.
Also, read: Earnings at risk – You need to fix some ads.txt file to avoid severe impact to your revenue
This will completely uninstall WordPress from your website on Hostinger. I hope you found this tutorial helpful and that you were successfully able to uninstall WordPress. Thanks for reading, and have a nice day! 🙂
Reinstall WordPress via Administrative Dashboard
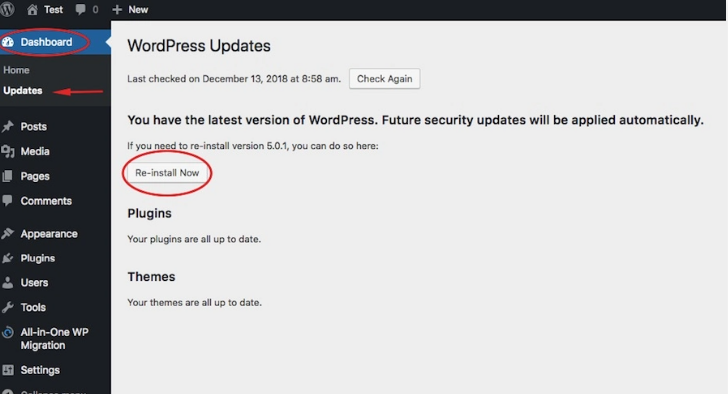
This method helps reinstall WordPress while keeping all your stuff safe, and it’s super easy. You do it using your WordPress dashboard. If you can’t get into the dashboard, don’t worry! You can do it another way called FTP, but we’ll talk about that later.
If you’re using the dashboard, it’s as easy as pie. Just go to the sidebar, click on “Dashboard,” then go to “Updates,” and hit the “Re-install Now” button. Easy peasy!
Reinstalling WordPress via Auto-Installer
If you’re stuck because of those annoying errors and can’t reach your WordPress dashboard, don’t worry! You can use the Hostinger auto-installer feature instead.
It’s pretty similar to the method we talked about earlier. The only difference is that you’ll have to download and then re-upload your wp-content files manually to reset your WordPress installation.
Here’s what you need to do:
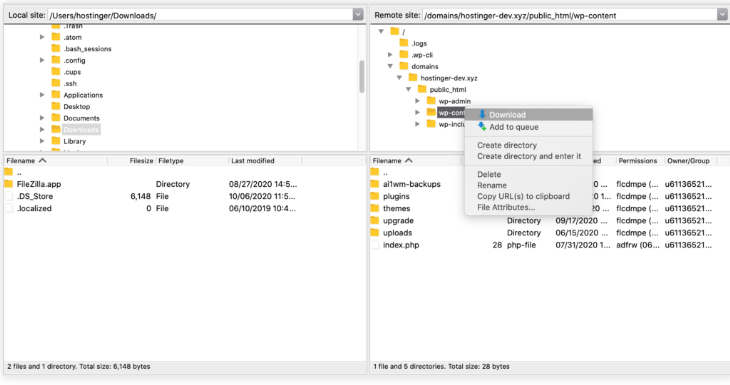
- First, connect to your account using an FTP client, like FileZilla.
- Once you’re in, find your website’s wp-content folder on the right-side window (remote site). Right-click on it and select “Download.” Your files will then be downloaded to your computer, to the location you’ve chosen on the left-side window (local site). This might take a little while, so be patient!
Here’s how you can reinstall WordPress using the Hostinger auto-installer feature:
- Log in to your Hostinger account and go to the Website section in hPanel. Click on the Auto Installer button.
- Look for the WordPress option and select it.
- A new window will appear. Fill in the required information, such as login details and website title. Make sure to select the option “Overwrite Existing Files.”
- Click Install to start the process.

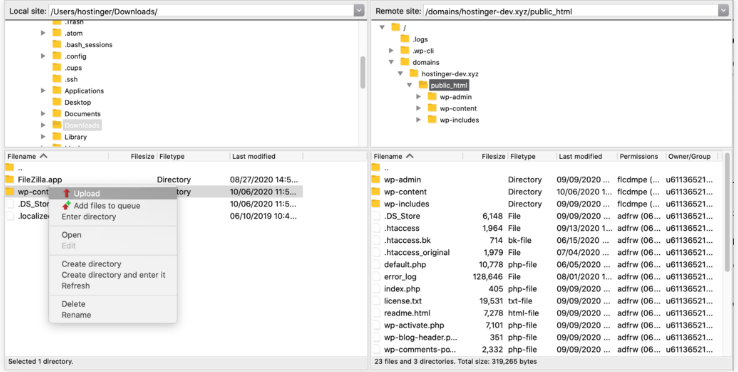
Now, let’s upload the wp-content folder back to your website:
- Open your FTP client and refresh the file and folder lists.
- On the left-side window (local site), select the wp-content folder that you previously downloaded.
- Right-click on the folder and choose Upload.
- Ensure that you’re uploading the files to your site’s root directory.
That’s it! Your WordPress installation should now be reinstalled, and your wp-content folder restored.
Reinstalling WordPress Using WP-CLI
You can also reinstall WordPress using WP-CLI, a command-line tool that offers various customization options for your WordPress installation. It can perform tasks like adding or removing users, categories, and posts, as well as searching and replacing content in the database.
Here’s a command line that you can use to reset WordPress without affecting themes and plugins:
wp core download --skip-content --forceThis command will download the WordPress core files while skipping the content, such as themes and plugins, and overwrite existing files if necessary. It’s important to note that WP-CLI is fully installed and supported on all Hostinger’s WordPress plans.
How to Completely Reinstall WordPress (Delete All Files)
Important! Before proceeding with this method, please keep in mind the following: using this approach will permanently delete all of your content files. Be absolutely sure there’s no content worth saving, as once this is done, you won’t be able to undo it.
You might want to do this if you encountered WordPress errors you can’t fix, for example. Maybe you just want a clean slate and start everything anew.
With that out of the way, there are only two steps involved in the process. First, delete all of your existing WordPress files. Secondly, install a fresh new copy using whichever method you prefer. It’s really that simple. To delete the files, use Hostinger file manager or connect via FTP and delete the files that way.
Deleting your existing WordPress database is not necessary, even if you plan on using a new one. However, if you want to completely start over, we don’t blame you. On Hostinger, you can delete the database by navigating to the MySQL Databases section.
Similarly, you can use phpMyAdmin to drop the database, which also wipes out your database completely.
After that’s done, there will be nothing left. Now you can go ahead and start by installing a fresh WordPress copy as if it were a brand new website. Like with reinstalling WordPress itself, there are a few ways of doing this, either automatically or manually depending on your host.
If you’re with a web host like Hostinger, there’s a prepared one-click auto-installer that installs WordPress in a matter of seconds.
Alternatively, you can do this manually, which would set you back about five minutes.
We have covered all ways you can install WordPress here. Congratulations, at this point, you have an absolutely blank canvas for your website!
Conclusion
Considering everything, reinstalling WordPress is a straightforward process. Here’s a quick recap of how to do it:
- Use the Re-install now button in the WordPress dashboard.
- Download and upload the WordPress files to your server, excluding the wp-content folder.
- If you want a clean start, delete all WordPress files and/or the database. Then install a new copy using your preferred method.
We hope you found our guide helpful! If you have any questions, feel free to leave a comment below.
Learn more


1 Comment
fitspresso reviews · March 17, 2024 at 5:41 am
Your ideas and insights are unique and thought-provoking I appreciate how you challenge your readers to see things from a different perspective