Table of Contents
Hey there, fellow website wranglers! So, you’ve found yourself in the digital wilderness, navigating the twists and turns of web hosting with Hostinger, huh? Well, fear not! Today, we’re here to shed some light on one of the most critical tools in your hosting arsenal: cPanel. 🛠️
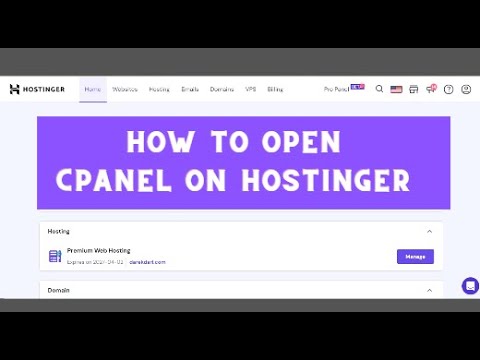
So, you’ve just signed up with Hostinger and you’re ready to dive into managing your website like a pro. One of the first things you’ll want to do is access cPanel, your trusty control panel for all things website-related. Lucky for you, opening cPanel on Hostinger is quick and easy, and I’m here to guide you through it in just 2 minutes!
You can watch the video for quick fix:
What is cPanel?
Before we jump in, let’s quickly go over what cPanel actually is. Think of it as the command center for your website. From here, you can manage your files, databases, domains, email accounts, and more—all from one convenient dashboard. It’s like having your own digital Swiss Army knife for website management.
Step-by-Step Guide to Opening cPanel on Hostinger
- Log in to Your Hostinger Account:
- Fire up your web browser and head to Hostinger’s website. Log in to your account using your username and password.
- Navigate to the Hosting Dashboard:
- Once logged in, you’ll land on your Hostinger dashboard. Look for the “Hosting” section and click on it to access your hosting services.
- Select Your Hosting Plan:
- If you have multiple hosting plans, select the one associated with the website you want to manage. This will take you to the hosting control panel.
- Locate the cPanel Icon:
- In the hosting control panel, you’ll see various icons representing different tools and services. Look for the cPanel icon—it’s usually labeled as “cPanel” or “Control Panel.”
- Click on the cPanel Icon:
- Once you’ve found the cPanel icon, give it a click. This will open up the cPanel interface in a new browser tab.
- Voila! You’re in cPanel:
- And just like that, you’ve successfully opened cPanel on Hostinger! From here, you can explore all the features and functionalities cPanel has to offer and start managing your website like a boss.
Why Use cPanel on Hostinger
- User-Friendly Interface: cPanel on Hostinger boasts a clean and intuitive interface, making it easy for beginners and seasoned users alike to navigate.
- Comprehensive Tools: From file management to domain management to email management, cPanel on Hostinger offers a wide range of tools to streamline website administration.
- Reliability and Performance: Hostinger’s robust infrastructure ensures that cPanel operates smoothly and efficiently, so you can focus on building and growing your online presence.
And there you have it—opening cPanel on Hostinger in just 2 minutes flat! With cPanel at your fingertips, you’ll have everything you need to take control of your website and unleash its full potential. Happy hosting! 🚀
What’s the Buzz About cPanel on Hostinger? 🐝
Alright, first things first. Let’s clear up any confusion. cPanel is like the command center of your website. It’s where you manage files, databases, domains, email accounts, and more, all from one convenient dashboard. Now, if you’re scratching your head wondering how to access this digital cockpit on Hostinger, fret not, my friend. We’ve got your back. 🤝
Easy Peasy, Lemon Squeezy: Accessing cPanel in Hostinger 🍋
So, you’ve got your Hostinger account fired up, and you’re ready to dive into the nitty-gritty. Here’s the lowdown on accessing cPanel in Hostinger:
- Step One: Log in to Your Hostinger Account
Head over to the Hostinger website and log in using your credentials. Once you’re in, buckle up for the ride! - Step Two: Navigate to Your Hosting Dashboard
Once you’re logged in, find your way to the hosting dashboard. This is where the magic happens. - Step Three: Locate the cPanel Icon
Ah, there it is, shining like a beacon in the night. Click on the cPanel icon, and voilà! You’re in. It’s that simple, folks!
But hey, if you’re more of a visual learner, check out this awesome tutorial for a step-by-step guide. Trust us, it’s worth a watch.
The Power of cPanel: What Can You Do? 💪
Now that you’ve cracked open the treasure chest that is cPanel on Hostinger, let’s talk about what you can actually do with this bad boy. Here’s a taste of the features at your fingertips:
| Feature | Description |
|---|---|
| File Management | Upload, download, and organize your website files. |
| Database Management | Create, edit, and manage your databases with ease. |
| Domain Management | Add, remove, and configure your domains hassle-free. |
| Email Management | Set up and manage email accounts for your domain. |
| Security | Secure your website with SSL certificates and more. |
And that’s just the tip of the iceberg, my friends. With cPanel on Hostinger, the sky’s the limit for your website. So go ahead, explore, experiment, and unleash the full potential of your online presence! 🌐
How to Use cPanel’s File Manager
The File Manager is your go-to tool for basic file management within cPanel. Similar to an FTP client, it allows you to upload, extract, create files and folders, and set permissions. Let’s dive into how to leverage its functionality effortlessly.
Step 1: Finding the File Manager
Once logged into your cPanel account, locate the File Manager under the Files section or simply search for it. Upon opening, you’ll be greeted with a window displaying navigation options and your website’s directory structure.
🔍 Pro Tip: We’ll primarily focus on the public_html folder for our tasks, as other folders are essential for cPanel’s functionality.
Step 2: Navigating the File Manager
The File Manager presents a folder tree on the left and contents on the right. Navigate by clicking folders or use the search feature for specific paths. Handy navigation functions like Home, Up One Level, Back/Forward, and Reload streamline your experience.
📁 Navigation Features:
- Home: Returns to the Home folder.
- Up One Level: Moves up a level in the directory.
- Back/Forward: Navigates like a web browser.
- Reload: Refreshes the page.
- Select/Unselect All: Convenient for file selection.
- View Trash: Accesses the Trash folder.
- Empty Trash: Clears the Trash folder.
Step 3: Utilizing File Management Features
Now, let’s explore the file management toolbar and contextual menu options for seamless operations.
🛠️ File Management Actions:
- File: Create new files.
- Folder: Create new folders.
- Copy/Move: Duplicate or relocate files.
- Upload: Add files to your hosting account.
- Download: Retrieve files to your computer.
- Delete/Restore: Move to or recover from Trash.
- Rename/Edit/HTML Editor: Edit files.
- Permissions: Assign file permissions.
- View: Preview files.
- Extract/Compress: Archive or extract files.
- Settings: Configure preferences.
🚀 Pro Tip: Exercise caution when adjusting permissions to avoid website issues.
That wraps up our guide on navigating and managing files with cPanel’s File Manager. Next, let’s delve into bandwidth usage, another critical aspect of your hosting plan.
How to Check Bandwidth Usage
Keeping an eye on your website’s bandwidth is key to staying on top of your hosting game. Here’s how to do it:
Step 1: Accessing Bandwidth Summary
Soon as you log in, peek at the bandwidth summary on the right. It gives you a quick snapshot of what’s been going down.
Step 2: Exploring Bandwidth Statistics
Dig deeper by hitting up the Bandwidth link. You’ll get the full scoop on your daily, weekly, and monthly bandwidth usage. Keep tabs on where that traffic’s coming from, whether it’s HTTP, FTP, or email. 📊
Step 3: Understanding Bandwidth Trends
Analyzing bandwidth trends can provide valuable insights into your website’s performance and visitor behavior. By identifying peak usage periods and popular content, you can optimize your site for better efficiency and user experience. Keep an eye on fluctuations in bandwidth usage and adjust your hosting plan accordingly to ensure smooth operation.
How to Check Disk Space Usage
Don’t sleep on your disk space, fam. Here’s how to make sure you’re not running out of room:
Step 1: Viewing Disk Space Summary
Soon as you log in, check out that short summary of your disk space usage. It’s right there on the right-hand side.
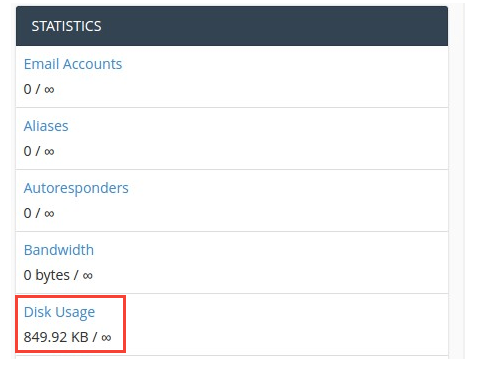
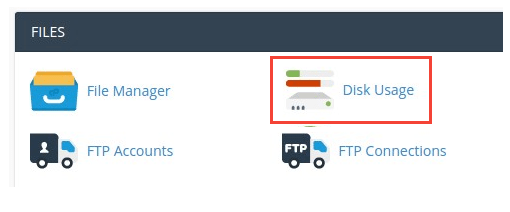
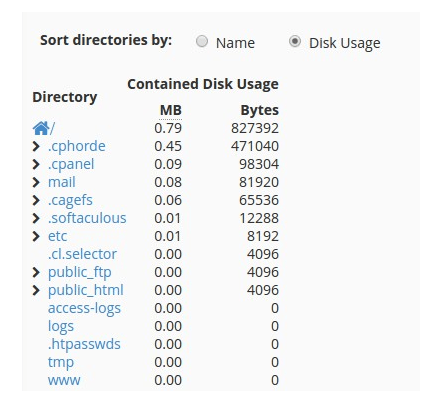
Step 2: Analyzing Disk Space Usage Statistics
Click on Disk Usage to dive deeper. Expand those folders to see where all your space is going. And if you need to clean house, jump into File Manager and start decluttering. 🧹
Step 3: Managing Disk Space Efficiently
Keeping your disk space in check is essential for maintaining optimal website performance. Regularly audit your files and folders to identify any unnecessary data and delete or archive it accordingly. Consider implementing a content delivery network (CDN) or optimizing media files to reduce storage requirements and improve loading times. By staying proactive in managing your disk space, you can ensure your website runs smoothly and efficiently.
By keeping tabs on your cPanel’s file, bandwidth, and disk space usage, you’ll be running your website like a boss. Stay on top of things, and your site will be smooth sailing! ⛵
Let’s dive into setting up two-factor authentication (2FA) on your cPanel account for an added layer of security:
How to Set Up Two-Factor Authentication
Your cPanel account holds crucial data, so beefing up security with two-factor authentication (2FA) is a smart move. Here’s how to get started:
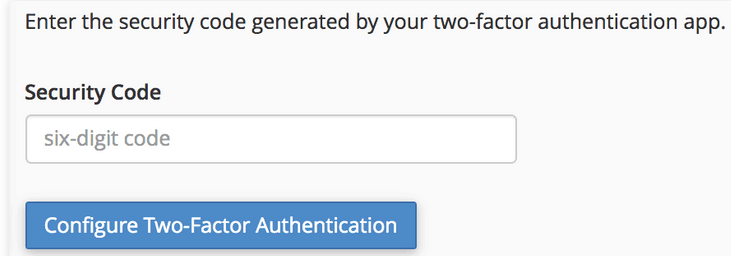
Step 1: Enabling Two-Factor Authentication in cPanel
- Log into cPanel: First things first, log into your cPanel account like you normally would. Then, head over to the Two-Factor Authentication tool.

- Initiate Setup: Click on the “Set Up Two-Factor Authentication” button to kickstart the process.
- Scan or Enter Key: Open up your Authy app on your device. You’ll have the option to either scan the QR code provided or manually enter the key.

- Verification: Once scanned or entered, you’ll see a six-digit token on your Authy app. Input this token into cPanel and hit “Configure Two-Factor Authentication.”
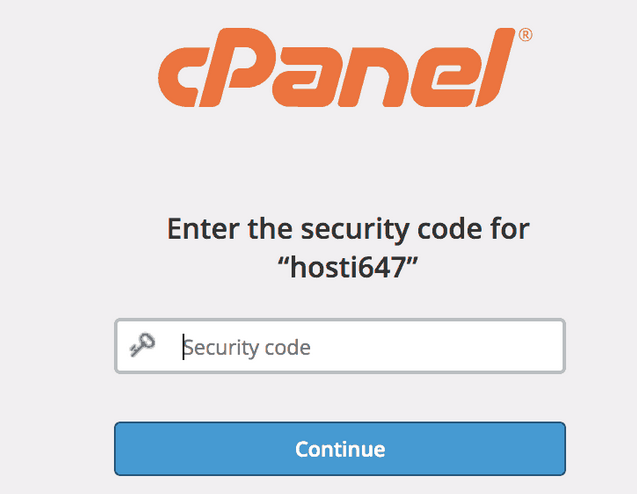
Step 2: Logging Back to cPanel
- Re-Login: After setting up 2FA, you’ll be directed back to the login window.
- Enter Token: Each time you log in, you’ll need to input the six-digit token from your Authy app.
Now, with 2FA in place, your account’s security is fortified. Even if someone gets hold of your password, they won’t be able to access your account without the unique token from your Authy app.
In the next part of our cPanel tutorial, we’ll walk you through how to set up Add-on Domains in cPanel, so stay tuned for that! 🚀
Alright, let’s dive into creating an add-on domain using cPanel:
How to Create an Add-On Domain
Add-on domains are like sidekicks to your main website, stored as subdomains within your cPanel account. With cPanel’s Addon Domains tool, you can easily manage multiple domains under one roof. Here’s how to get started:
Things You’ll Need:
- Access to your cPanel account
Step 1: Access Addon Domains Tool
From your main cPanel dashboard, locate and open the Addon Domains tool.


Step 2: Create an Addon Domain
Once inside the tool, you’ll need to fill out a form. Here’s what each field means:
- New Domain Name: Enter the domain name you want to add. For example, “example.com”.
- Subdomain: cPanel will automatically generate a subdomain name. Leave it as is if you’re only adding one domain. Modify it if you’re adding multiple domains with similar names.
- Document Root: This is the path for your add-on domain’s content, auto-filled by cPanel.
- Create an FTP Account (Optional): Decide whether you want to create a separate FTP account for this add-on domain.
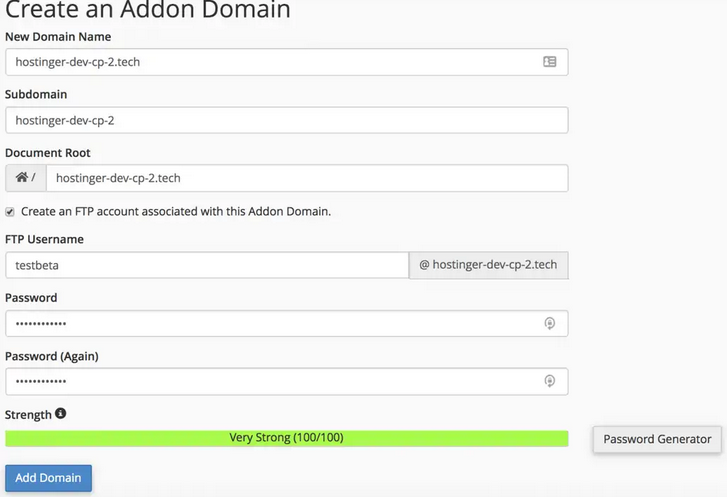
Once filled, hit the “Add Domain” button.
Now your add-on domain is created! You can start uploading files to the newly created subfolder using the File Manager in your cPanel account.
Step 3: Manage the Addon Domains
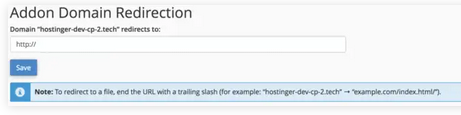
After adding the domain, you’ll see it listed in the “Modify Addon Domain” section. Here’s what each part means:

- Addon Domains: View all the domains you’ve added.
- Document Root: The folder path for each specific domain.
- Subdomain: Auto-generated subdomain name.
- Redirects to: Redirect the domain elsewhere if needed.
- Actions: Option to remove the add-on domain from the list.
Now you’re all set to create and manage add-on domains from your cPanel account. With just one account, you can handle multiple domains seamlessly, doing backend management and file uploads with ease. 🚀
Let’s walk through the process of creating a subdomain using cPanel:
How to Create a Subdomain
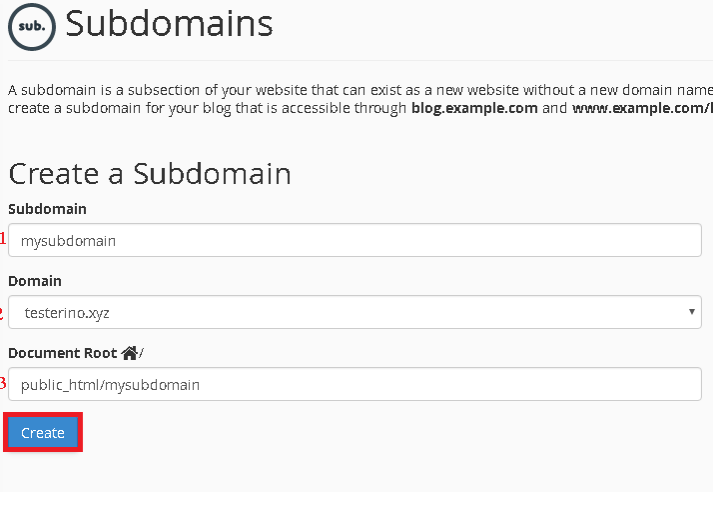
Subdomains are like branches off the main domain tree, allowing you to host additional websites or sections of your main site. Here’s how to create one:
- Access the Subdomains Section in cPanel: First things first, log into your cPanel account and locate the Subdomains section.
- Fill in the Fields: You’ll need to provide some details to create your subdomain:
- Subdomain Field: Enter the name of your subdomain here. For example, if you want to create a subdomain called “forum” for your website “mywebsite.com”, you’d enter “forum”.
- Domain Field: Choose the main domain under which the subdomain will be created.
- Document Root: This is the directory where your subdomain’s files will be stored. By default, it’s created in the public_html folder.
- Press Create: Once you’ve filled in the fields, hit the Create button to finalize the process.
You should see a confirmation message once the subdomain has been successfully created.
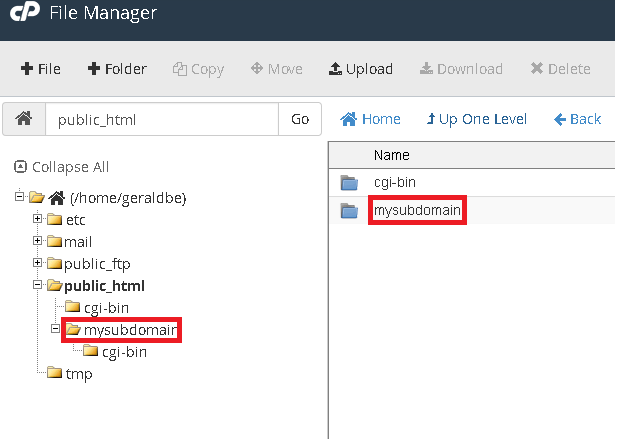
- Upload Files to Subdomain Document Root: Now that your subdomain is created, you can upload files to its Document Root directory. This directory is automatically created in the public_html folder and can be accessed using the File Manager section of cPanel.
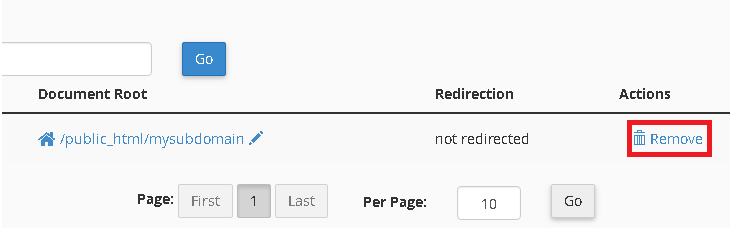
- Deleting a Subdomain: If you ever need to remove a subdomain, you can do so by pressing the Remove button in the cPanel -> Subdomains section. Keep in mind that this will not delete the root directory or files of the subdomain, so you’ll need to manually delete them using File Manager or an FTP client if necessary.
Remember, subdomains are a versatile way to expand your website without purchasing additional domain names. Whether you’re setting up a blog, forum, or shop, subdomains offer a cost-effective solution to meet your needs. Plus, they function independently from the main domain, giving you flexibility in managing your online presence.
Learn more
Let’s walk through the process of parking a domain using cPanel:
How to Park a Domain
When you’re building your brand online, it’s smart to secure multiple domain names to protect your identity. Whether it’s different TLDs or country-specific options, having various domains pointing to your primary one can safeguard your brand’s presence. Here’s how to park a domain using cPanel:
Things You’ll Need:
- Access to your cPanel account
- Multiple domain names
Step 1: Access Aliases
Start by logging into your cPanel account and locating the Aliases tool under the Domains section.
Step 2: Create a New Parked Domain
In the “Create a New Alias” section, enter the domain name you want to park and click “Add Domain”.
For instance, if you’re adding “example.org” as an alias, visitors typing that URL will be directed to your primary domain, “example.com”.
Step 3: Manage Redirection
Once you’ve added the domain, it will appear in the aliases list. Click on “Manage Redirection”.

Pro Tip
If you want to check and register domain names, you can do so using our domain name search tool.
Step 4: Alias Redirection
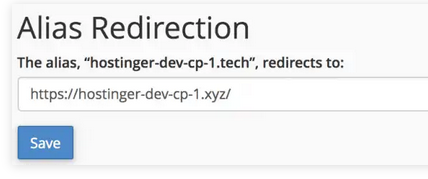
In the form, specify the primary domain you want the alias to redirect to and click “Save”.
Please note that DNS propagation may take up to 24 hours for the changes to take effect worldwide.
By parking additional domain names using cPanel’s Aliases tool, you can ensure that visitors reaching your secondary domains are seamlessly redirected to your primary domain. This not only protects your brand but also ensures a consistent online presence across different domain extensions and variations.
Conclusion
In wrapping up our journey through the intricacies of cPanel on Hostinger, it’s clear that mastering this platform unlocks a world of possibilities for website owners. 🚀 With just a few clicks, users can access a plethora of tools to manage their online presence efficiently and effectively.
From swiftly opening cPanel to maneuvering through various tasks like creating add-on domains, setting up subdomains, or parking additional domains, it offers a user-friendly interface designed to simplify website administration. 💻 Whether you’re launching a new venture or bolstering an existing brand, cPanel equips you with the flexibility and control needed to expand and protect your online presence.
Furthermore, keeping an eye on bandwidth usage and disk space allocation ensures optimal performance and resource management, while the implementation of two-factor authentication adds an extra layer of security to safeguard your valuable data. 🔒
In essence, navigating it with finesse allows website owners to take charge of their online endeavors confidently. Whether you’re a seasoned webmaster or just starting out, mastering it is a valuable skill that empowers you to thrive in the dynamic digital landscape. 🌐 So, embrace the power of cPanel, and watch your online ventures soar to new heights! 🌟


1 Comment
Ads.txt File To Avoid Severe Impact To Your Revenue 2024 · April 14, 2024 at 1:51 pm
[…] How to Open cPanel on Hostinger: cPanel […]