
Table of Contents
How to Fix Vanguard Error Codes in League of Legends
If you’re having trouble loading League of Legends due to an error code starting with “VAN,” don’t worry! These errors indicate that Vanguard, Riot’s anti-cheat software, is facing some issues with your system settings. The good news is that most of these errors can be fixed easily with some simple troubleshooting.
In this post, we’ll dive into common Vanguard error codes, explain what they mean, and guide you through step-by-step solutions to get back into the game.
Check this also:
What Are Vanguard Error Codes?
Vanguard error codes typically occur when the anti-cheat system conflicts with your computer’s settings or connection. Whether it’s a connection issue, outdated software, or specific security requirements, there’s a fix for each problem.
Before jumping into the solutions, here’s a helpful video for visual learners:
VAN Error Codes & Solutions
How to fix van-1 in League of Legends?
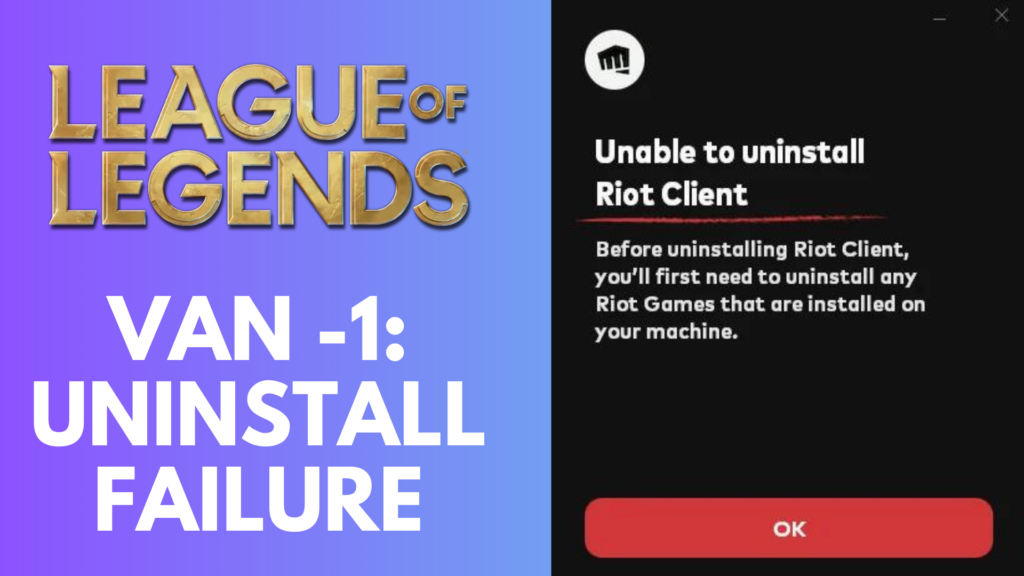
What it means: The Vanguard uninstallation process failed.
Solution:
- Uninstall Riot Vanguard manually by going to the Control Panel or Apps Settings on your PC.
- Once uninstalled, restart your PC.
- Reinstall League of Legends, and Riot Vanguard will automatically reinstall.
- If the issue persists, submit a support ticket for further assistance.
VAN 0, VAN 1, VAN 6: Connection Error
What it means: A connection issue may have caused Vanguard to lose authentication.
Solution:
- Close League of Legends and the Riot Client.
- Ensure your internet connection is stable. Check for any firewalls, VPNs, or proxies that could block Riot Vanguard.
- Restart both League of Legends and the Riot Client.
- If the issue persists, reboot your PC.
vanguard error 68
league of legends vanguard error
vanguard error van 128
league vanguard error 68
vanguard error 185
vanguard error van 68 league of legends
league vanguard error
VAN 68: Connection Error
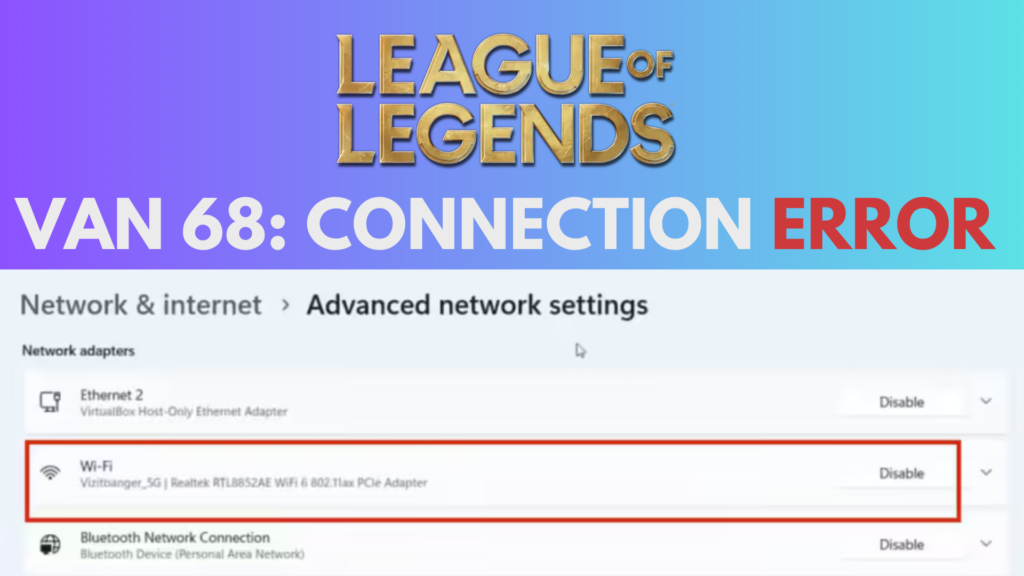
What it means: Another connection error, usually tied to your network.
Solution 1: Restart Internet Connection
Sometimes, you might experience an internet glitch, which can lead to the error code VAN 68. Restarting your internet connection should resolve this problem. Here’s how to do it:
- Open settings menu
- Click on Network and Internet
- Click on Advanced Network settings
- Here, next to your internet connection click on the option Disable
- Once disabled again, click on Network and internet
- Click on Advanced Network settings
- Your Wi-Fi will show you again. Click on Enable and connect with your Wi-Fi or Ethernet.
This will restart your Internet connection and, in turn, resolve the VAN 68 connection error ❤️
Solution 2: Remove Troublesome Software
Another effective way to resolve the connection error code VAN 68 in League of Legends is to uninstall any troublesome software from your computer.
Killer Control Center is known to interfere with the launch of LOL’s anti-cheat software. To fix this, you can either uninstall the application or ensure it is completely closed. Here’s how to close the app:
- Open Task Manager
- Locate Killer Control Center, right-click on it, and select End Task
- Go to the Startup tab and find the app
- Right-click on it and choose Disable
By doing this, you will fully close the Killer Control Center. Now, restart the Riot client, and you should be able to enjoy the game.
Check this also:
Solution 3: Resetting Network Connection
If rebooting your internet connection doesn’t fix the VAN 68 error, try resetting your network connection. Here’s how to do it:
- Click on the Start menu and type cmd
- Choose the option Run as administrator
- In the command prompt, type in the following commands one by one
Netsh int ip reset
Netsh winsock reset
Ipconfig /release
Ipconfig /renew
Ipconfig /flushdns
Restarting your network connection and clearing the DNS cache can be a great solution for resolving the VAN 68 connection error. Be sure to follow these steps to reset your network connection.
Solution 4: Whitelist in Windows Firewall
The security features of your Windows firewall are conflicting with the anti-cheat software of the Riot client, leading to connection problems. To resolve this, you should add the Riot client to your whitelist. Here’s how to do it:
- Click on the Start menu and type Windows Security
- Open the application and click on Firewall and Network Protection
- Click on Allow an app through firewall
- Click on Change settings and from the list find the Riot client app
- Tick both the options Private and Public and save the changes.
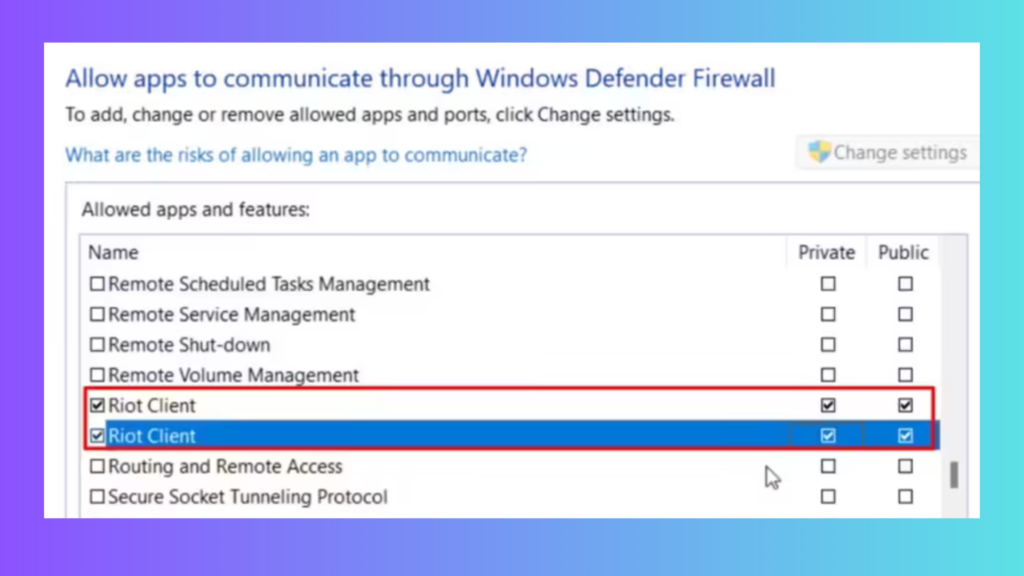
Once done, restart your game to fix VAN 68 connection error.
lol vanguard error
vanguard error league of legends
vanguard error van 84
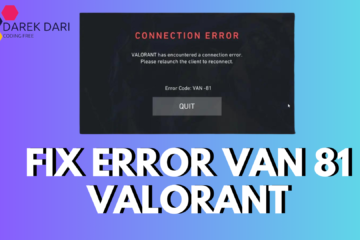
VAN -81, VAN -102, VAN -104: Persistent Connection Errors
What it means: A deeper issue with your system or Vanguard software.
Solution:
- Restart your PC and Riot Client.
- If the error continues, uninstall Riot Vanguard and League of Legends.
- Reinstall League of Legends, which will automatically reinstall Vanguard.
- If this doesn’t work, submit a ticket to Riot Support.
VAN 84: Network Connection Error
What it means: A problem with your network connection.
Solution:
- Ensure that your network connection is stable.
- Restart both League of Legends and the Riot Client.
- If necessary, reset your router and check for firewalls or security software that may be interfering.
Check this also:
VAN 128: Authentication Error
What it means: This code often appears when your system fails Vanguard’s security checks.
Solution:
- Restart your PC and the Riot Client.
- If the error persists, follow the detailed steps in the Troubleshooting VAN 128 Guide.
- As a last resort, uninstall both Riot Vanguard and League of Legends, then reinstall them.
VAN 138: Virtual Machine Detected
What it means: Riot Vanguard cannot run on a virtual machine.
Solution:
- If you are using a virtual machine, switch to a regular instance of Windows.
- Install League of Legends and Riot Vanguard on your regular Windows setup.
VAN 152: HWID Ban
What it means: Valorant error code VAN 152 usually points to a problem with the Vanguard anti-cheat system, which is essential for ensuring a fair competitive atmosphere in Valorant.
When this error pops up, it typically indicates that Vanguard is having trouble operating correctly, which in turn blocks your access to the game.
Common Reasons for Error Code VAN 152
- Vanguard not functioning properly: The anti-cheat system may not have launched as it should or could be facing an error.
- Conflicting third-party applications: Other programs on your computer, particularly those that have deep system interactions like antivirus software, might be causing issues with Vanguard.
- Driver problems: Outdated or damaged drivers, especially for network and graphics hardware, could disrupt Vanguard’s operation.
- System integrity problems: Corrupted system files or settings may hinder Vanguard from working as intended.
Solution:
- This is a serious ban and cannot be fixed by simple troubleshooting.
- Submit a support ticket to Riot Games for further questions or appeals.
vanguard error 68
league vanguard error 68
vanguard error van 68 league of legends
vanguard error van 68 league
league of legends vanguard error van 68
vanguard error van 68
how to fix league vanguard error 68
lol vanguard error 68
riot vanguard van 68 error code
vanguard 68 error
VAN 185: Multiple Device Login Issue
What it means: This issue is usually caused by being logged into the League Client on multiple devices.
Solution:
- Log out of League of Legends on all devices.
- Restart League of Legends and the Riot Client.
- If you’ve left the client running for more than seven days, simply restart the client.
Check this also:
VAN 1067: Software Conflict
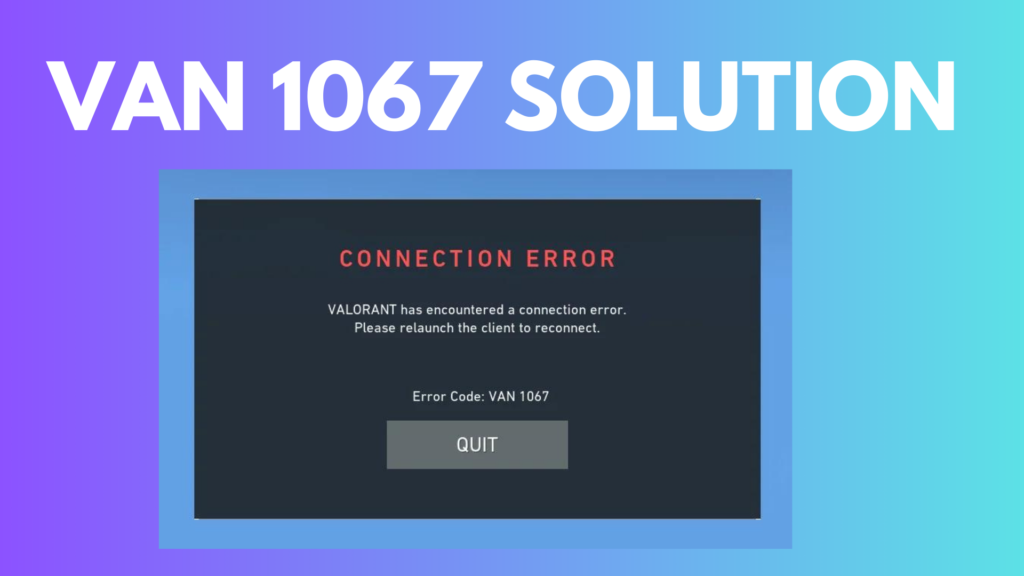
What it means: There’s potentially a software conflict or malware interfering with Vanguard.
Solution:
- Restart your PC and the Riot Client.
- If the error persists, check your Task Manager for any unusual or suspicious programs.
- Perform a malware scan to ensure there’s nothing malicious running in the background.
Special TPM and UEFI Errors (Windows 11)
VAN 9001: TPM 2.0 Not Enabled
What it means: Your system does not have TPM 2.0 enabled, which is required to run Vanguard on Windows 11.
Solution:
- Check if your system supports TPM 2.0 by pressing Windows key + R, typing
tpm.msc, and checking the version. - If TPM is disabled, reboot into your BIOS by pressing Delete during startup.
- In the BIOS, enable TPM 2.0 under the Security or Advanced tab.
- Save the changes and reboot.
vanguard error van 152
vanguard error 152
VAN 9005: UEFI Mode and TPM 2.0 Required
What it means: Vanguard requires TPM 2.0 and UEFI to ensure security features are active (the version of vanguard requires secure boot).
Solution:
- Enter your BIOS by pressing Delete during startup.
- Change your BIOS mode to UEFI (if it’s not already set).
- Enable TPM 2.0 in the BIOS security settings.
- Save your changes and reboot your PC.
VAN 9006: Outdated Windows Version
What it means: Your current Windows version is no longer supported.
Solution:
- Upgrade to Windows 10 build 1803 (Codename Redstone 4) or later.
- If you’re on Windows 11, ensure you’re up to date with the latest version to avoid this issue.
Check this also:
Why is Vanguard Asking for TPM 2.0 and Secure Boot?
Q: Why am I getting the message “This build of Vanguard requires TPM version 2.0 and secure boot to be enabled in order to play under Windows 11”?
A: Vanguard requires both TPM 2.0 and Secure Boot to be enabled for playing Valorant or League of Legends on Windows 11. Here’s how to fix this:
- Restart your PC and press Delete to enter BIOS.
- Press F3 to load optimized default settings and press F10 to save them.
- In the Security menu, enable Secure Boot.
- Under Key Management, choose Restore Factory Keys and confirm.
- Go to Advanced Menu > CSM Configuration and disable CSM Support.
- Press F10 to save and reboot.
- Once in Windows, press Windows key + R and type
tpm.msc. If the Specification Version shows 2.0, you’re good to go!
If your motherboard doesn’t support TPM 2.0, you’ll need to downgrade to Windows 10 to continue playing.
VAN 68 Connection Error
Here are some answers to common questions that users have been searching for across various websites. I’ve compiled these responses to help everyone find the information they need all in one place.
How do I uninstall Valorant?
Uninstalling Valorant can be a bit tricky, but it’s definitely possible. Start by ensuring that all Riot client services are closed on your system through the task manager.
To uninstall a game or application, you can also use the built-in Windows tool known as Control Panel, in addition to any app uninstallation programs. If you’re looking to uninstall Valorant this way, follow these steps:
Step 1: On Windows 11/10, type Control Panel in the search bar and hit Enter to launch the application.
Step 2: From the View by drop-down menu, select Category.
Step 3: Click on the Uninstall a program link located under Programs.
Step 4: Scroll through the list of features and programs to locate Riot Vanguard and VALORANT. Right-click on each one and select Uninstall.

Check this also:
Delete Valorant via Windows Settings
Another way to remove a program or game like Valorant is to access the Settings page. Follow the guide on how to uninstall Riot Vanguard and Valorant in this way:
Step 1: Navigate to the Settings window by pressing the Win + I keys on your keyboard.
Step 2: Move to Apps > Apps & features.
Step 3: In Windows 10, browse the list of apps to find Riot Vanguard, click it, and tap on Uninstall. In Windows 11, find Riot Vanguard, click three vertical dots, and choose Uninstall.

Step 4: Do the same thing to VALORANT in Settings to uninstall the game itself.
Remove Valorant via Command Prompt
Besides these ways, you can find another way to uninstall Riot Vanguard and Valorant from your Windows 11/10 PC and do it in Command Prompt by following these instructions:
- Step 1: Press Win + R to open Run, input cmd, and press Ctrl + Shift + Enter. Then, click Yes to grant admin rights to this command tool.
- Step 2: Execute these two commands one by one. Remember to press Enter after each one.
sc delete vgc
sc delete vgk
- uninstall Valorant via CMD
- Step 3: After running these commands, restart your PC.
- Step 4: Then, go to C:\Program Files, find the Riot Vanguard folder and delete it.
Check this also:
What is the size of Valorant?
If you’ve installed Valorant, you might be surprised to see it listed as taking up a massive 3 TB or more. However, that’s not the actual size of the game.
To find the true size, check the folder where Valorant is installed, typically located at C:\Riot Games\Valorant.
The real size of Valorant is around 20 GB, and any other size displayed on your system is likely just a Windows glitch.
Valorant System Requirements
VALORANT is celebrated for its excellent optimization, allowing it to run well on a variety of PC setups. To enjoy the game at a smooth 60 FPS, here are the system requirements:
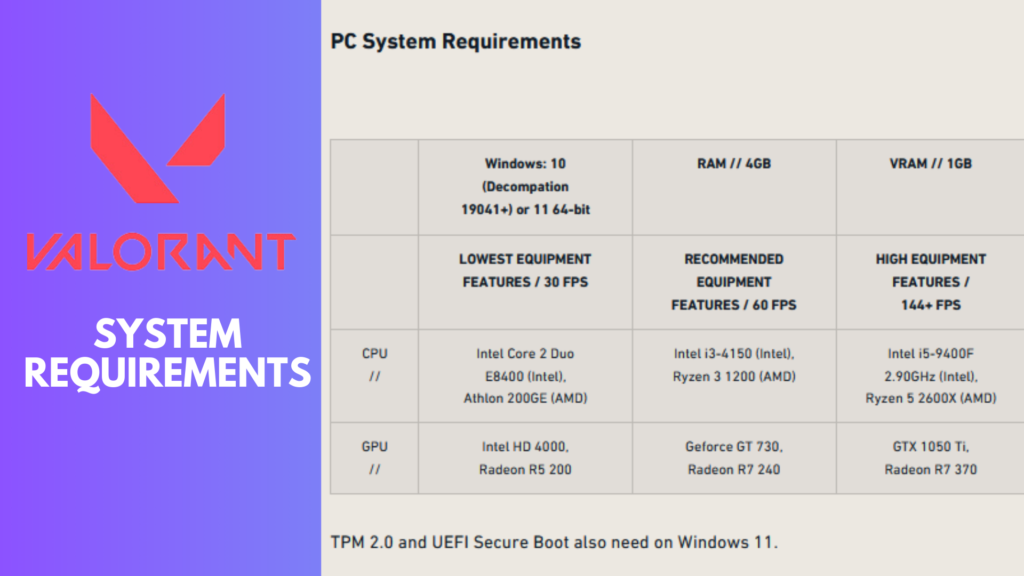
Minimum Requirements:
- CPU: Intel i3-4150 / AMD Ryzen 3 1200
- GPU: GeForce GT 730 / Radeon R7 240
- OS: Windows 10 (64-bit)
- RAM: 4 GB
- VRAM: 1 GB
Recommended for 144+ FPS:
- CPU: Intel i5 9400F (2.9 GHz) / AMD Ryzen 5 2600x
- GPU: GeForce GTX 1050 Ti / AMD Radeon RX 470
- OS: Windows 10 (64-bit)
- RAM: 4 GB
- VRAM: 1 GB
These requirements cater to a wide range of systems, ensuring that even those with lower specs can enjoy the game without issues.
How can I enable secure boot for Valorant?
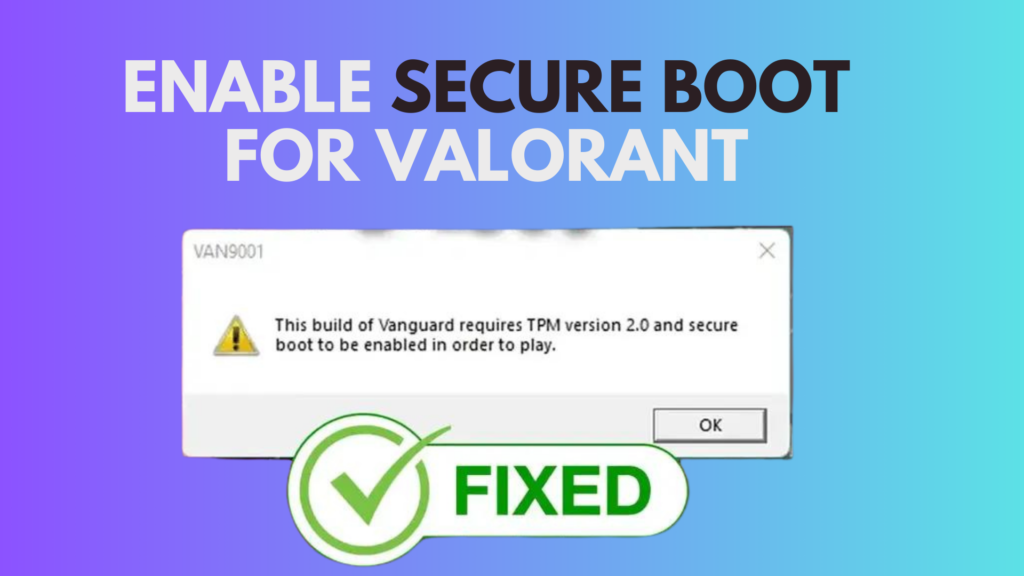
Secure boot is a feature that you can activate through your system’s BIOS menu.
To do this, you first need to convert your Windows from MBR to GPT; otherwise, your Windows won’t boot after enabling secure boot.
Step 1. Power down your computer
Step 2. Accessing the BIOS
Step 3. Navigating the BIOS
Step 4. Enable Secure Boot
Step 5. Save and restart
Once you’ve made that change, access the BIOS menu, navigate to the Security tab, and enable the Secure Boot option. Then, switch the BIOS mode from Legacy to UEFI. After making these adjustments, press the F10 key to save your changes and restart your computer.
Check this also:
Conclusion
With these detailed solutions, you’ll be back in the game in no time! If you still face issues, consider checking out Riot’s support page or submit a ticket for help.
Encountering Vanguard error codes in League of Legends or Valorant can be quite annoying, but the good news is that many of these problems can be resolved with relative ease. Whether you’re facing connection issues, software conflicts, or the TPM 2.0 requirement on Windows 11, this guide will provide you with the necessary steps to troubleshoot and fix these errors.
lol vanguard requires tpm 2.0, vanguard error van 0, selkirk vanguard 2.0, this version of vanguard requires tpm 2.0, vanguard tpm 2.0, tpm 2.0 vanguard, pokemon vanguard 3.0, selkirk invikta vanguard 2.0, vanguard 2.0, riot vanguard tpm 2.0
Start with the basics, such as verifying your internet connection or restarting the Riot Client. For more specific concerns like TPM 2.0 or UEFI mode, make sure your system settings are correctly adjusted in the BIOS. It’s also crucial to keep your system and Riot software up to date to prevent these errors from occurring in the future.
By implementing these solutions, you’ll be back in the game in no time and can minimize any future interruptions. If you continue to experience issues, don’t hesitate to reach out to Riot’s support team for additional help.
Now that you have the right tools at your disposal, best of luck, and enjoy your gaming experience🎮
Learn more


9 Comments
Best Fix VAN 152 (Fixed) Valorant Error Code · September 7, 2024 at 2:41 pm
[…] Check this also: All Vanguard issues with solutions […]
Best Fix Van 68 Valorant Error Code Windows 10 And 11 · September 7, 2024 at 3:04 pm
[…] All Vanguard issues with solutions […]
How To Convert AI Text To Human Free 2 Tools To Humanize AI · September 8, 2024 at 1:04 pm
[…] All Vanguard issues with solutions […]
How Do I Fix VAN 0? Best Fix For VAN 0 Valorant Error · September 14, 2024 at 8:13 am
[…] All Vanguard issues with solutions […]
كيف يمكنني إصلاح خطأ VAN أفضل حل لخطأ VAN في Valorant · September 14, 2024 at 10:36 am
[…] جميع مشكلات Vanguard مع الحلول […]
Best Secure Boot And TPM 2.0 In Windows 11 For Valorant Fix · September 15, 2024 at 5:39 pm
[…] All Vanguard issues with solutions […]
Best Solution For VAN 128 - How To Solve Van 128 · September 22, 2024 at 12:40 pm
[…] All Vanguard issues with solutions […]
How To Fix Valorant Van 9003 Error Windows 11 - Best Fix · September 22, 2024 at 12:40 pm
[…] All Vanguard issues with solutions […]
How To Fix Error Van 81 Valorant? Best Solution 2024 · September 28, 2024 at 9:54 am
[…] All Vanguard issues with solutions […]