
How to Launch a Static WordPress Site: A Step-by-Step Guide
Building and deploying a static version of your WordPress site can drastically improve speed, security, and scalability. This guide will walk you through the entire process — from setting up your local environment to going live with your static site using GitHub and Cloudflare Pages.
✅ All the tools mentioned in this guide are free or have a free plan available.
Tools & Accounts You’ll Need
Before you begin, make sure you have the following:
- Local by Flywheel (for local WordPress development)
- GitHub account (for version control and hosting static files)
- Cloudflare account (for deploying your static site)
- Simply Static plugin (to convert WordPress to a static site)
- A domain name (you can purchase one through Cloudflare if needed)
Step 1: Set Up Your Local WordPress Site
1.1 Install Local by Flywheel
Download and install Local. Once launched, click the + icon at the bottom left to begin creating a new site.
Choose “Create a new site” and proceed with the Preferred setup (unless you need a custom configuration).
1.2 Name Your Site
Give your site a name — preferably the final one you plan to use — as WordPress uses this name in various internal references.
1.3 Set Admin Credentials
Enter your preferred WordPress username, password, and email. Avoid common usernames like “admin” and use a strong password. Once done, click Add Site.
💡 Tip: Enable One-click admin login to bypass the login screen while working locally.
Step 2: Configure Simply Static and Export Your Site
2.1 Install the Simply Static Plugin
- Go to Plugins → Add New in your local site dashboard
- Search for Simply Static
- Click Install and then Activate
Once active, you’ll see a new Simply Static option in the sidebar.
2.2 General Settings Configuration
Navigate to Simply Static → Settings and adjust the following:
Replacing URLs:
- URL Type: Set to Absolute URLs
- Scheme: Choose https://
- Host: Enter your final domain name
- Force Replacements: Enable

Include:
- Additional URLs: Add any unlinked pages
- 404 Page: Enable this option
- Feeds: Leave this unchecked unless you need RSS

Exclude:
Usually, no changes are needed here. The plugin handles most default exclusions on its own.
2.3 Integration Settings
Under Integrations, enable Admin Bar (Core) to add a shortcut to Simply Static in your WP admin bar.
2.4 Deployment Settings
Go to Deploy → Deployment Method, and select Local Directory.
Now, define where your static files will be saved:
- Mac: Create a folder using Terminal:
mkdir ~/Desktop/static-site - Windows: Create it using Command Prompt:
mkdir %USERPROFILE%\Desktop\static-site
Then specify the full path in Simply Static’s settings.
Example paths:
- Mac:
/Users/yourusername/Desktop/static-site - Windows:
C:\Users\yourusername\Desktop\static-site
Disable Clear Local Directory (should be off by default), and Save.
2.5 Disable Comments (Important for Static Sites)
Go to Settings → Discussion and uncheck all options under Default post settings. Save changes.
2.6 Export Your Site
Click Generate in Simply Static to build the static version of your site. Monitor progress via the Activity Log. Once complete, your static files will be saved in the directory you specified.
Step 3: Set Up GitHub for Deployment
GitHub will host your site’s code and integrate with Cloudflare Pages for automatic deployment.
3.1 Install Git
- Windows: Download from git-scm.com
- Mac: Run
git --versionin Terminal; if not installed, follow the prompt
3.2 Initialize Git in Your Static Folder
Navigate to your static site directory:
cd path/to/static-site
git init
3.3 Create a .gitignore File
Create this file to ignore unnecessary files:
Mac:
touch .gitignore
Windows:
echo. > .gitignore
Open it in a text editor and paste:
# System files
.DS_Store
Thumbs.db

# IDE files
.vscode/
.idea/

# Temp files
*.log
tmp/
3.4 Stage & Commit Your Files
git add .
git commit -m "Initial static site commit"
3.5 Create a GitHub Repository
- Go to github.com
- Click + → New repository
- Name it (e.g.,
my-static-site) - Set it to Private
- Don’t initialize with README or .gitignore (you already have one)

Click Create Repository.
3.6 Connect Local Repo to GitHub
Generate a Personal Access Token:
- Go to Settings → Developer Settings → Personal access tokens
- Click Generate new token (classic)
- Check the repo scope
- Set an expiration (or choose “No Expiration”)
- Copy the token and store it safely
Then, connect your repo:
git remote add origin https://USERNAME:TOKEN@github.com/USERNAME/REPO.git
Replace:
USERNAMEwith your GitHub usernameTOKENwith your tokenREPOwith your repository name
Set the main branch and push:
git branch -M main
git push -u origin main
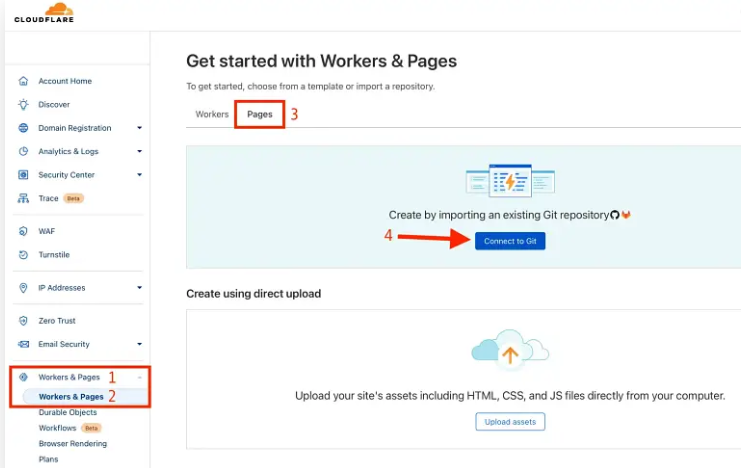
Step 4: Deploy to Cloudflare Pages
4.1 Connect GitHub to Cloudflare
- Log into Cloudflare
- Go to Workers & Pages → Pages
- Click Connect to Git
- Authorize GitHub and select your repository
Cloudflare will auto-detect the repo and guide you through deployment.
⚠️ Note: Initial propagation may take a few minutes. If you see an error, wait and refresh.
4.2 Link a Custom Domain
Once deployed:
- Click Add custom domain
- Enter your domain name
- Click Begin DNS transfer
Cloudflare will handle DNS updates, and your static site will be connected to your domain.
Absolutely! Here’s the updated and rewritten section using “Step 5” instead of “Phase 5” — while keeping it clear, human-friendly, and optimized for SEO:
Step 5: Automate WordPress Site Updates (The Smart, Clean Way)
So your static WordPress site is live — hosted for free, secured with SSL, and running lightning-fast. Mission accomplished?
Almost.
If you plan to update your site regularly (even just once every few months), it’s important to set up a simple, efficient update workflow. That’s because updating a static site isn’t like updating a traditional WordPress site. You don’t just hit “Save” and call it a day.
💡 Here’s the catch:
Every time you make a change, you’ll need to:
- Regenerate the static version using Simply Static
- Push those updated files to GitHub
- Let Cloudflare Pages redeploy your site
If you just overwrite all your files and push them again every time, your GitHub history gets bloated. That slows things down and makes version control messy.
So, what’s the smarter way?
🐍 Use a Python Script to Push Only Real Changes
We’ll use a lightweight Python script to detect what actually changed and only commit those files — making updates clean, fast, and automated.
🔧 Step 5.1: Set Up Your Automation Folder
Create a new folder on your Desktop to keep your tools organized. Call it something like:
website-tools
This is where you’ll save your scripts.
✍️ Step 5.2: Write the Python Script
- Open Notepad (Windows) or TextEdit (Mac)
- Paste the code below:
import os
import subprocess
import time

def run_git_commands(repo_dir):
    os.chdir(repo_dir)
    git_status = subprocess.run(["git", "status", "--porcelain"], capture_output=True, text=True)

    if git_status.stdout.strip():
        print("Changes found, committing...")
        commit_message = f"Site update - {time.strftime('%Y-%m-%d %H:%M:%S')}"

        subprocess.run(["git", "add", "."])
        subprocess.run(["git", "commit", "-m", commit_message])
        subprocess.run(["git", "push"])

        print("Update complete.")
    else:
        print("No changes detected. Nothing to push.")

if __name__ == "__main__":
    REPO_DIR = "/Users/yourusername/Desktop/static-site"  # Update this path!
    run_git_commands(REPO_DIR)
- Update the
REPO_DIRline to match the path where your static site files are saved - Save the file as:
update_site.py
Store it inside your website-tools folder.
⚙️ Step 5.3: Create a One-Click Script to Run the Python File
💻 On Mac:
- Open a new text file and paste:
#!/bin/bash
python3 ./update_site.py
- Save it as:
update-website.sh
- Open Terminal and navigate to your script folder:
cd ~/Desktop/website-tools
- Make the script executable:
chmod +x update-website.sh
To run your update:
./update-website.sh
💡 Tip: On older Macs, change
python3topythonif you run into errors.
🖥 On Windows:
- Open Notepad and paste:
@echo off
python update_site.py
pause
- Save the file as:
update-website.bat
- Just double-click this file whenever you want to push changes. That’s it!
🔁 Step 5.4: Your Update Workflow (Now Fully Automated)
Whenever you want to update your site, here’s the flow:
- Open Local by Flywheel and make changes to your WordPress site
- Use Simply Static to regenerate the static version
- Run your update script:
- Mac:
./update-website.sh - Windows: Double-click
update-website.bat
- Mac:
- Your changes are committed to GitHub and auto-deployed to Cloudflare
🎉 Done! You Now Have a Lightweight WordPress Site With Auto Updates
You’ve officially built a WordPress site that:
- Costs under $11/year
- Runs fast and secure on Cloudflare Pages
- Uses GitHub for clean version tracking
- Updates with a single script
It’s lean, powerful, and built for long-term performance.
Learn more


0 Comments